WHAT CAN THIS BOX DO?
This Servo-RC, Sonar Sensor Arduino kit turns any run-of-the-mill project, workbench or any space for that matter into the belly of a submarine. Just plug this bad boy in, start the application and get ready to hunt for the Red October!
WHAT IS INCLUDED IN THIS KIT?
-
One Arduino (Mega/Uno) pre-programmed with the sonar application;
-
One HC-SR04 ultrasonic sonar sensor;
-
One TowerPro 9G Servo RC motor;
-
One piezo buzzer;
-
Wires needed to connect all the parts together;
-
Processing 2.0 PC-based application for sonar view;
-
One licence to hunt submarines. No, not really;
-
Russian accent and a taste for vodka!
Since only three pins are used on the Arduino, the system allows for a lot of further development. You can add lights, motors, sensors, GSM, Wi-Fi, RFID, TFT, LCD, etc. This is a great educational piece and can be used to prove how sonars work by making use of a great interactive enviroment, along with a graphical interface.
Please follow these steps to implement the application, but first go on a two-week vacation, get a soldering gun, 100ft of solder, download a 1000 page microcontroller book, give up on your social life.. JUST KIDDING. Everything's ready for you to assemble and you should be done in the next 10 minutes! No solder, no boring books, just connect!
Please use the schematic (figure 1) in the following image to connect the elements to the Arduino.
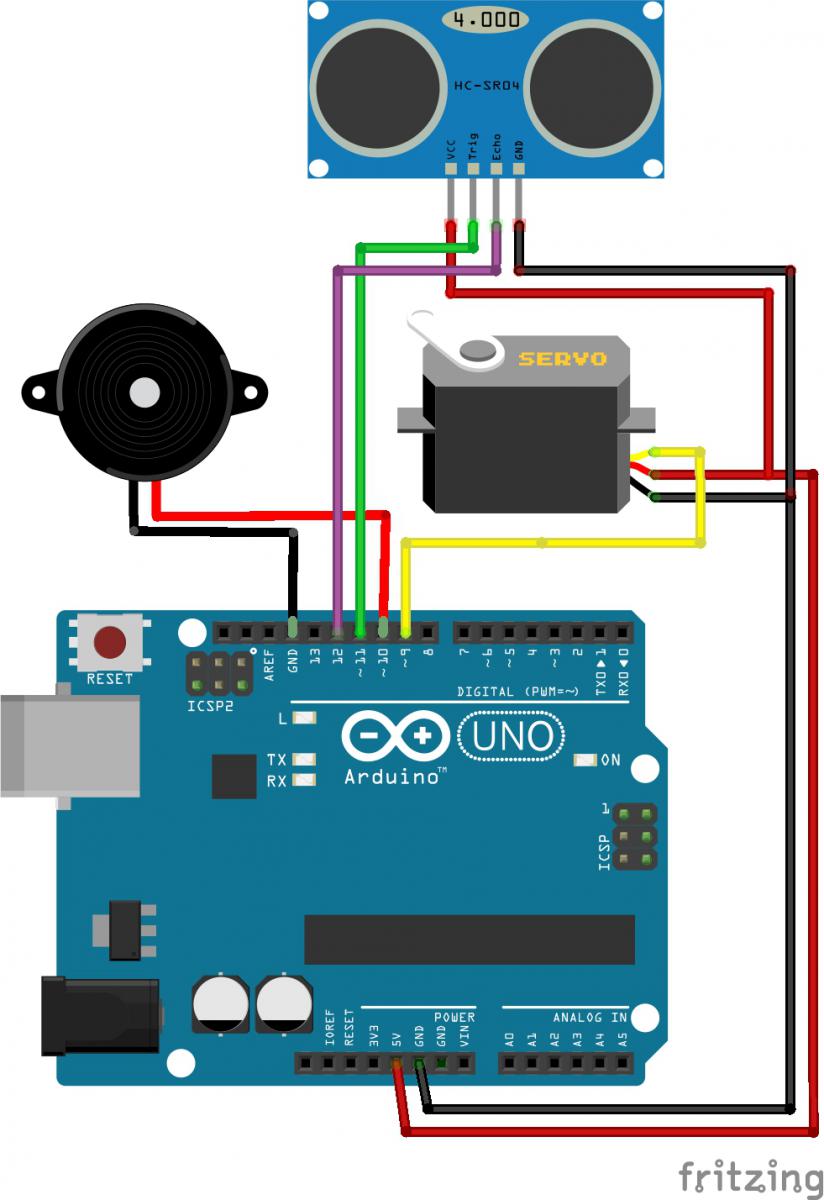
Figure 1
*Note: Same configuration of pins applies if you are using the Arduino Mega or Nano
1. Connect the Servo RC to the Arduino
Servo RC motors are in fact just small DC motors whose output shaft is connected to a train of geared wheels. What this does is lower the speed of the output shaft of the servo RC motor but greatly increases torque, much like the gears in a car. Add a potentiometer that allows you to track movement of the shaft and you've got a closed loop position controller.
Since Servo RC motors have a bad habit of draining a lot of power when moving, we highly suggest using an external power source for the Arduino.
Use the following table to connect the Servo RC to the Arduino:
|
Servo |
Arduino |
|
+5V (usually red) |
+5V |
|
GND (usually brown) |
GND |
|
Signal IN (usually orange) |
Digital pin 9 (PWM) |
Now, connect the Arduino to the PC by using the USB cable provided. Start up the servo_test.ino (Right click>Save target as) application and click on Upload to write the program to the board (figure 2). To run and upload .ino files you will need the Arduino IDE (free software) , located at http://arduino.cc/en/main/software . You will also need the New Ping library for the Arduino, located here.

Figure 2
If'you've done everything above correctly, you should see the motor hopping from one position to the next at random. If you click on the Serial monitor (figure 3), you should be getting the following message:
Servo motor at position (random number between 0 and 180)
Servo motor at position (random number between 0 and 180)
Servo motor at position (random number between 0 and 180)
Servo motor at position (random number between 0 and 180)
............
............
............

Figure 3
2. Connect the Piezo Buzzer and Ultrasonic Sensor to the board
Now, use the below table to connect the Piezo Buzzer and Ultrasonic Sensor to the board:
|
Arduino |
Piezo |
Sensor |
|
+5V |
N/A |
+5V |
|
GND |
Black wire |
GND |
|
11 |
N/A |
Trigger (Trig) |
|
12 |
N/A |
Echo |
|
10 |
Red wire |
N/A |
Pretty simple, right? Now, upload piezo_sensor_test.ino (Right click>Save target as) to the board. You should be hearing a beeping noise at regular intervals. Starting the Serial Monitor should output the below lines:
Sensor online. Object detected at (value according to obstacles)
Sensor online. Object detected at (value according to obstacles)
Sensor online. Object detected at (value according to obstacles)
Sensor online. Object detected at (value according to obstacles)
............
............
............
Want more?: