Android tablet app controls a Relay via Bluetooth
In this step you will be controlling a relay with a Android App that you will be developing using the MIT App Inventor This step has two parts, part one will be controlling a relay and part two will be sending data to OLED from Android App. Complete this step before moving to step 3.
What you need.
- Arduino Board
- Pc (Windows or Mac)
- Internet Access
- Google account
- DHT Sensor
- 1 Channel Relay
- Android OS running Device (Phone or tablet)
- Bluetooth Module
- OLED display
- Connector cables
Arduino Bit:
Step 2 – Part 1 Controlling a Relay
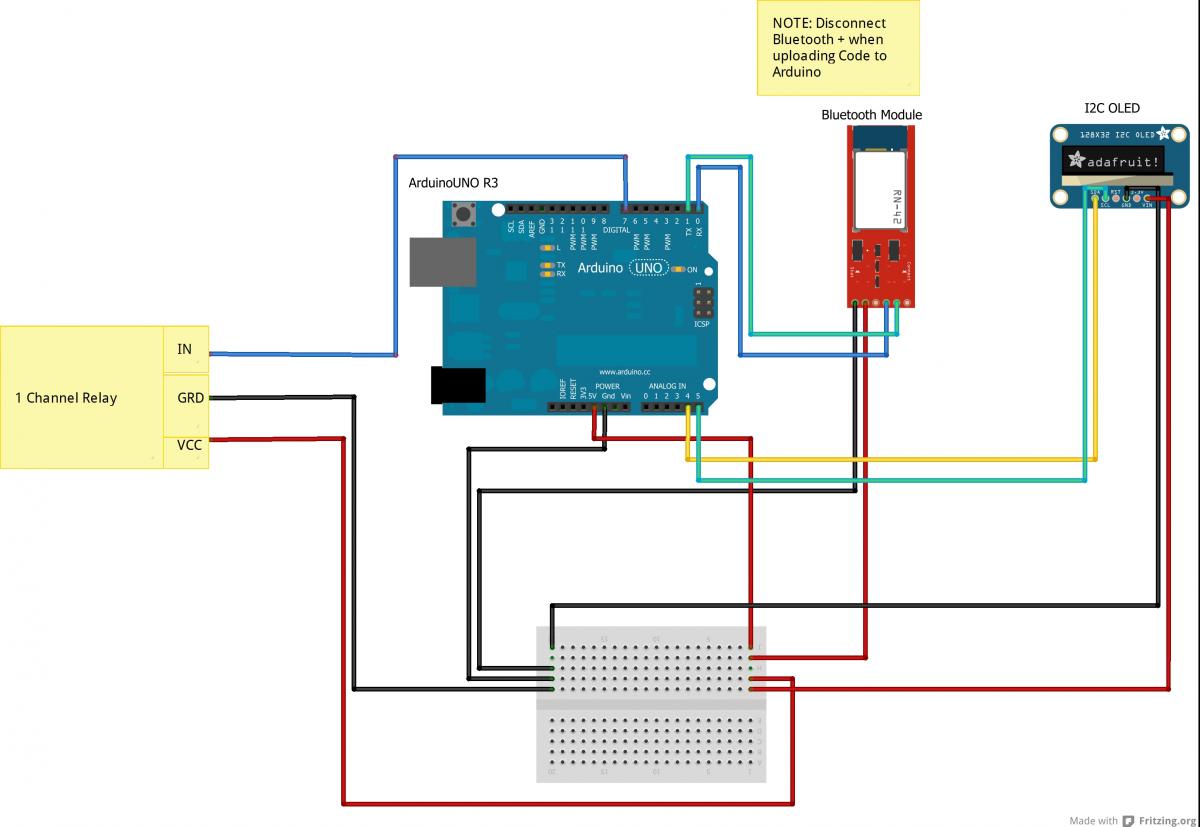
Wiring the Hardware for step 2
- Do the component wiring as show in the wiring diagram below.
- Note: when uploading the code to Arduino. Unplug 5V from the Bluetooth to disable it. Since USB and Bluetooth uses same TX/RX it will throw an error when loading code while Bluetooth is on.
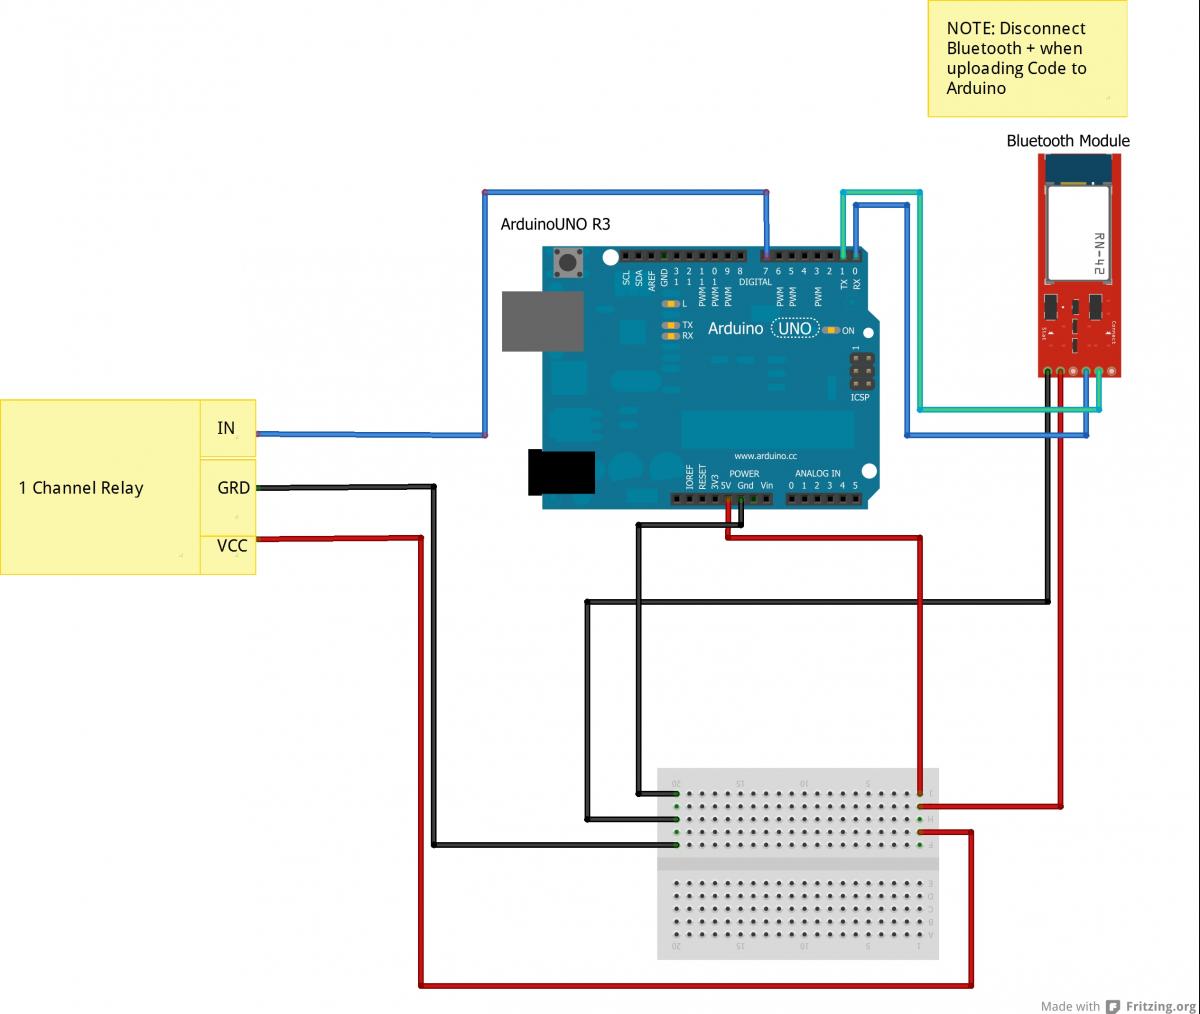
Pin Mapping
| Arduino | Bluetooth |
| 1(TX) | RX |
| 0(RX) | TX |
| GRD | GRD |
| 5V | 5V (VCC) |
| 1 Channel Relay | |
| 5V | VCC |
| GRD | GRD |
| 7 | IN |
Arduino Code for step 2
[ Arduino2Android_relay_setup.ino available on purchase]
Android Bit:
- Turn on Relay
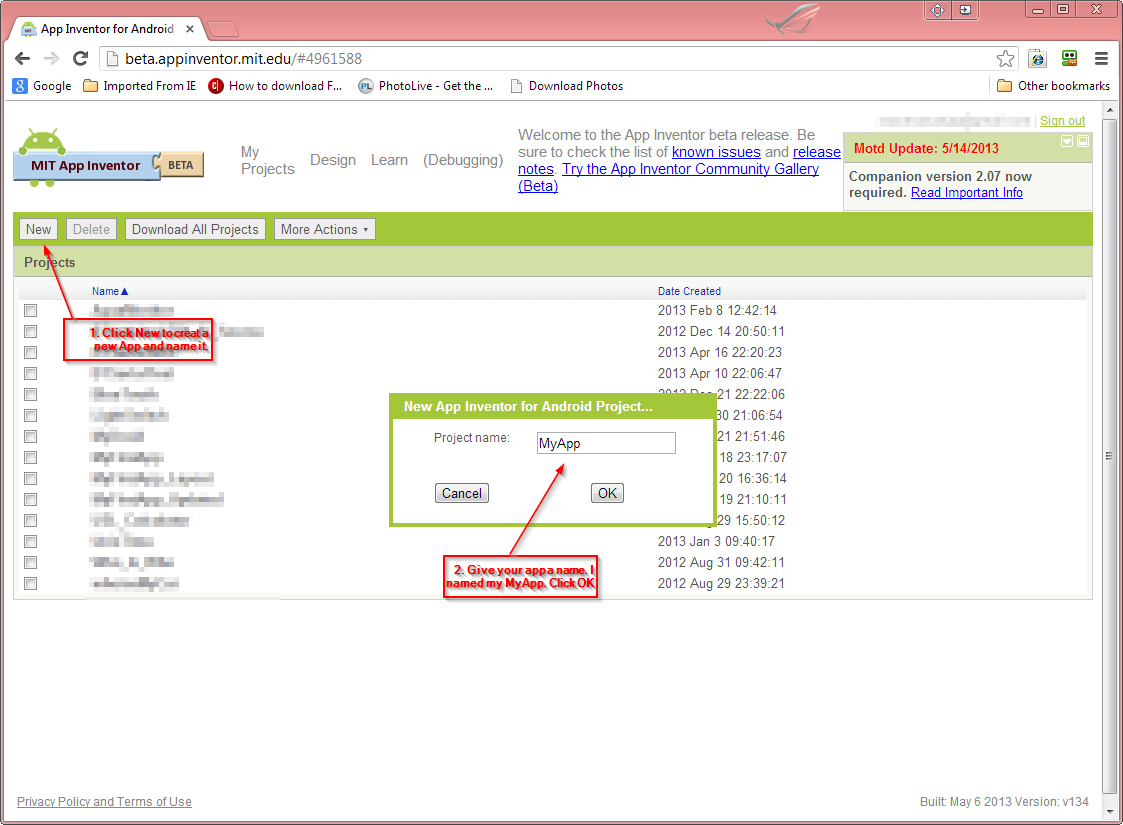
- Log onto App Inventor using your credentials and create a new app and name it as you wish. In the example below its named MyApp. You will chnage this to RelayControl.
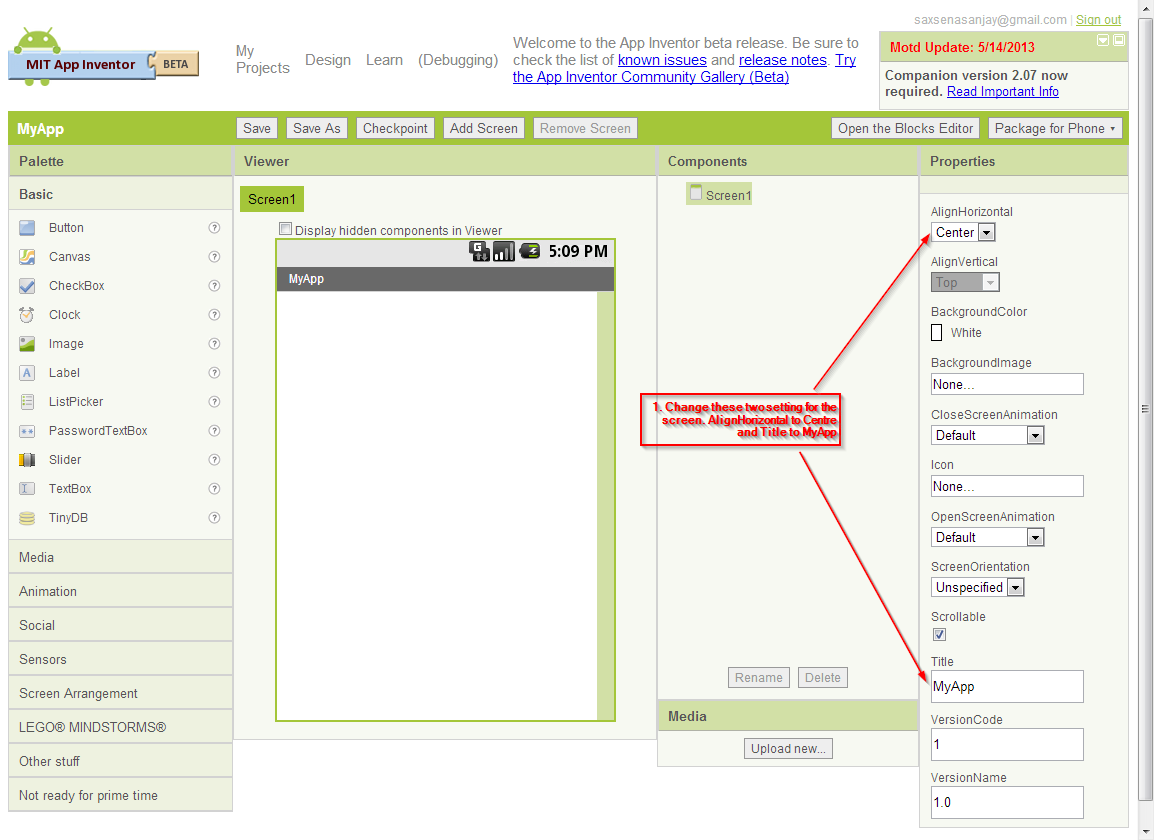
- Change the property for the screen
- AlignHorizontal = centre
- Title = Relay Control (you can choose anything you like)
- Note: You can change the ScreenOrientation to Landscape now if you want or later in Part 4 of this kit tutorial.
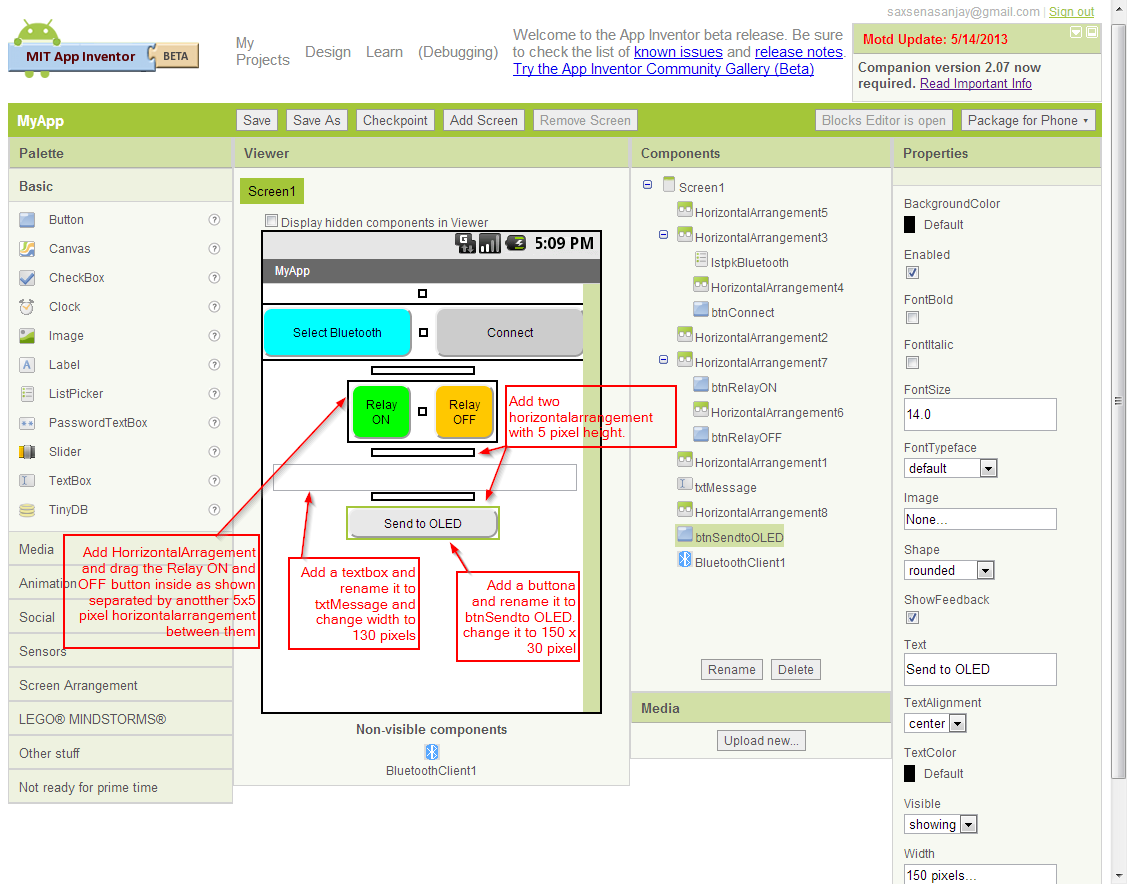
- Here is the list of component that is needed to turn a relay on and off. Drag them to your app Screen. Arrange them show below.
- Two Buttons (one for ON and another for OFF)
- BluetoothClient(for connection Android to Arduino)
- Two HorizonatalArrangement (Use this to create space and layout)
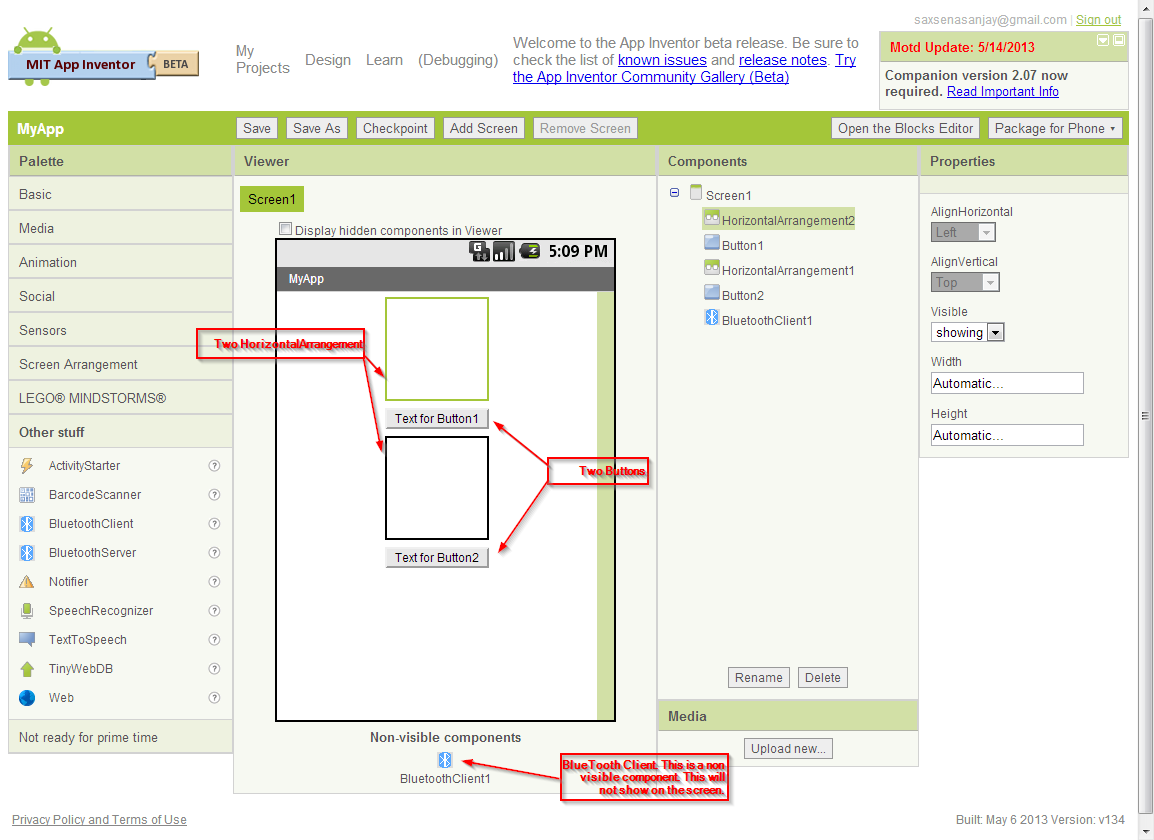
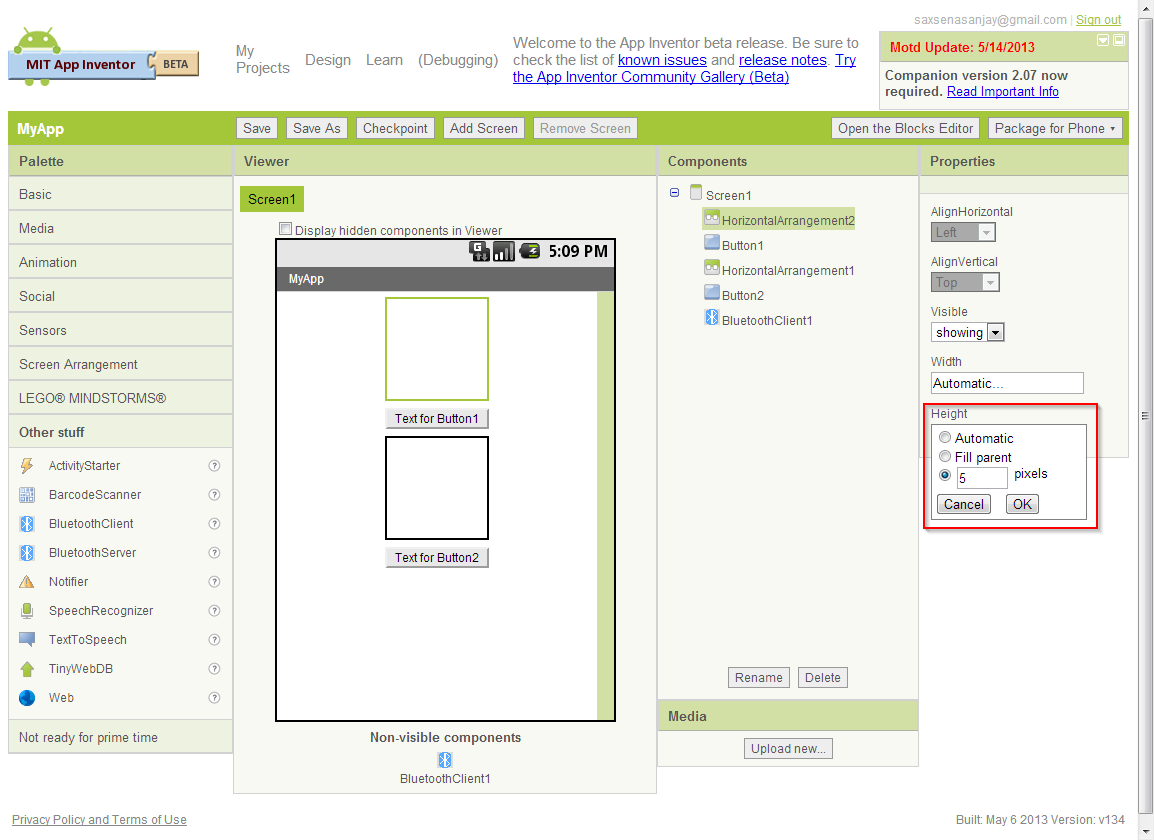
- Select the HorizontalArrangement Component from component list on screen and change its Height property to 5 pixels.
- Click OK.
- Do the same to second HorizontalArrangement.
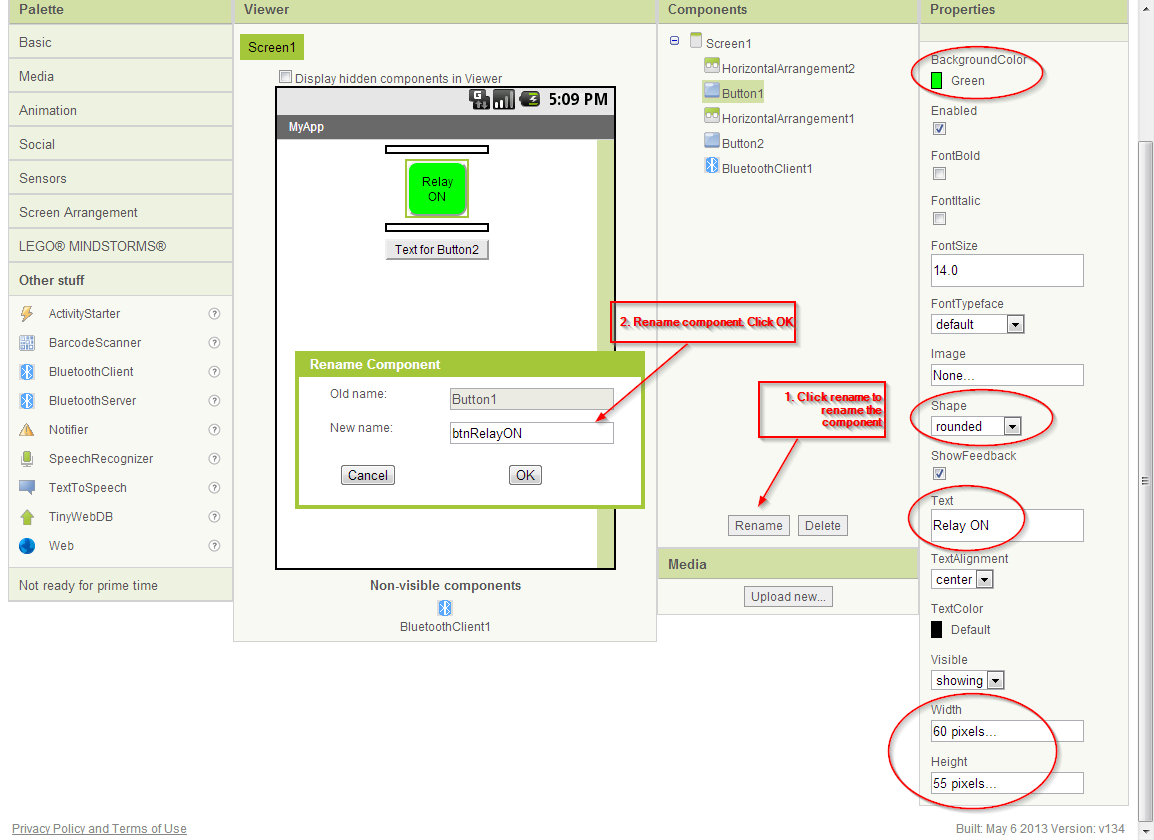
- Select Button 1 and rename it to btnRelayON and change the following properties:
- Background Color = Green
- Shape = rounded
- Text = Relay ON
- Width = 60 pixel
- Height = 55 pixel
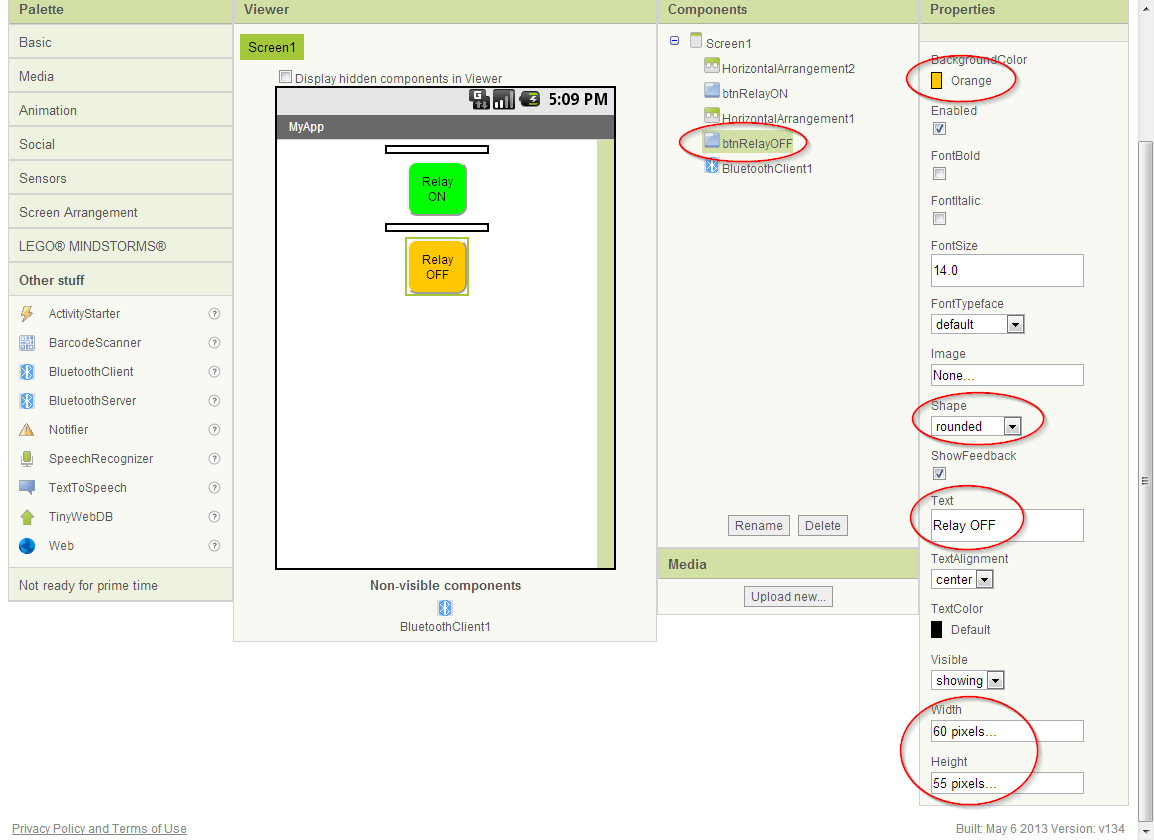
- Select Button 2 and rename it to btnRelayOFF and change the following properties:
- Background Color = Orange
- Shape = rounded
- Text = Relay OFF
- Width = 60 pixel
- Height = 55 pixel
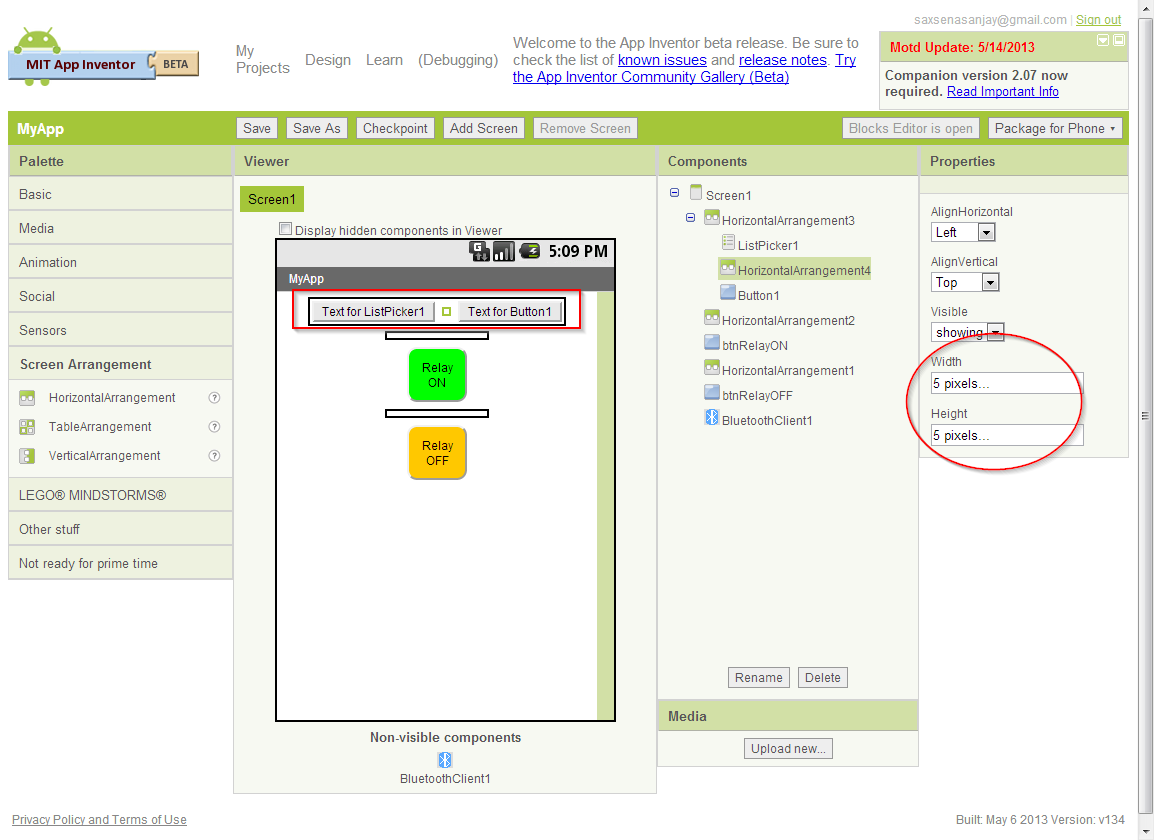
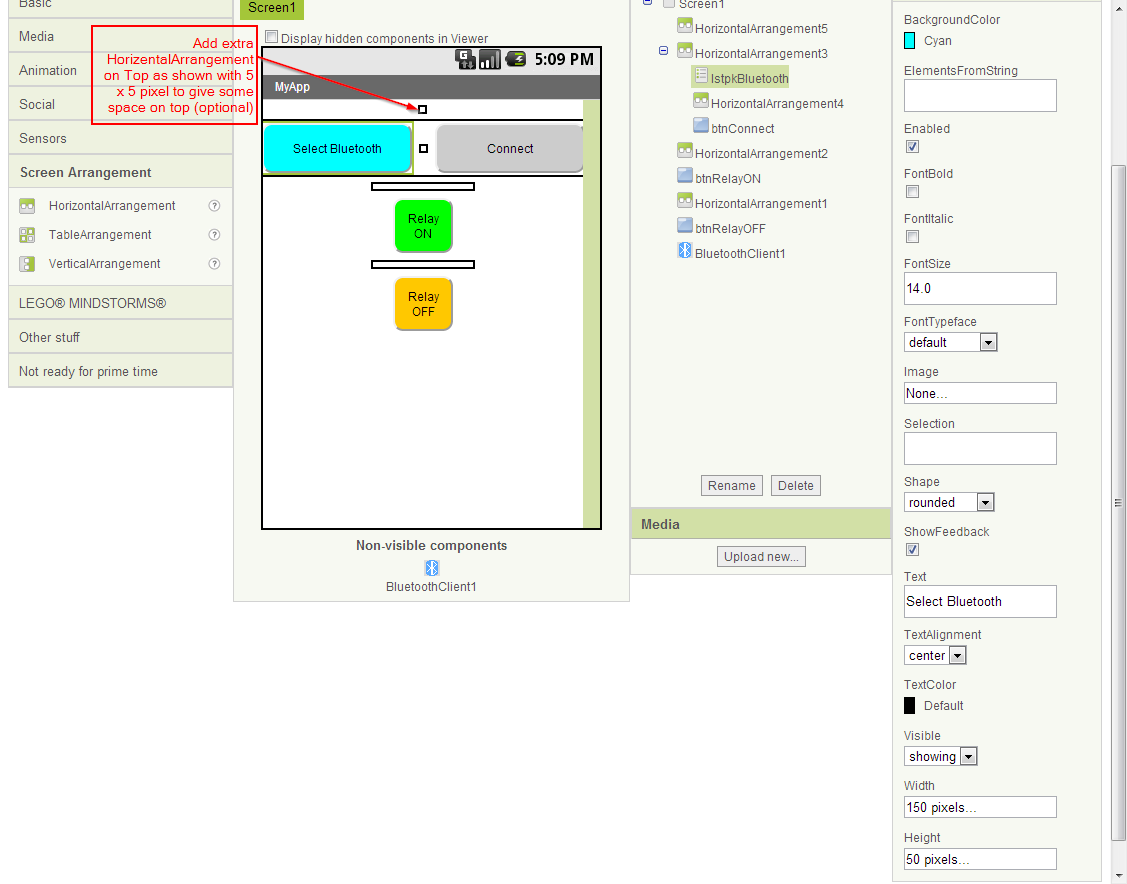
- These are the component we need to select the paired Bluetooth and then initiate the connection. Drag this to your screen as shown.
- First Drag the HorizontalArrangement on very top. Drag the ListPicker inside the HorizonatalArrangement . Also drag the Button inside the HorizonatalArrangement to the right .
- Drag the second HorizonatalArrangement in-between the ListPicket and Button and change its Width and Height properties to 5 pixel.
- Two HorizonalArrangement
- One Button
- One ListPicker - (from Basic -> List Picker)
- Change the properties of the ListPicker and Button as below:
ListPicker
- Rename = lstpkBluetooth
- Background Color = Cyan
- Shape = Rounded
- Text = Select Bluetooth
- Width = 150 pixel
- Height = 50 pixel
Button
- Rename = btnConnect
- Background Color = Light Gray
- Shape = Rounded
- Text = Connect
- Width = 150 pixel
- Height = 50 pixel
Optiaonal
- Add an extra HorizentalArrangement on top as show with 5 x 5 pixel to add some space on top of screen.
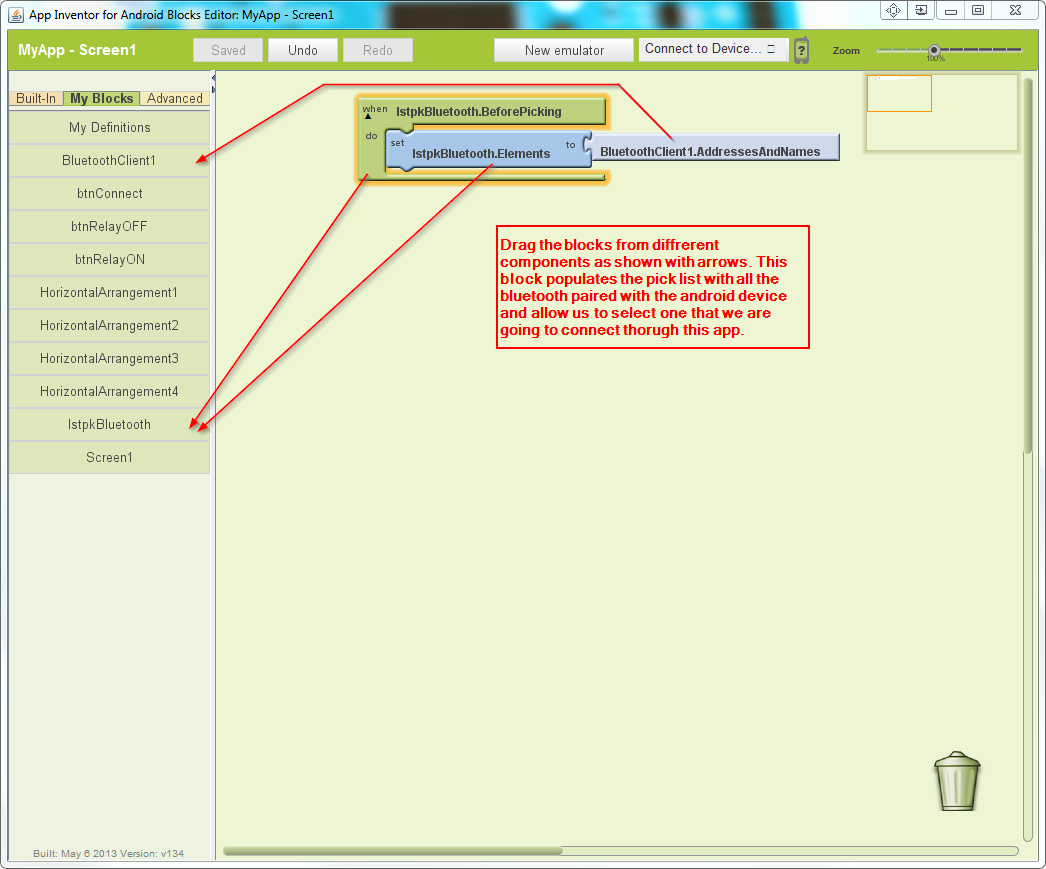
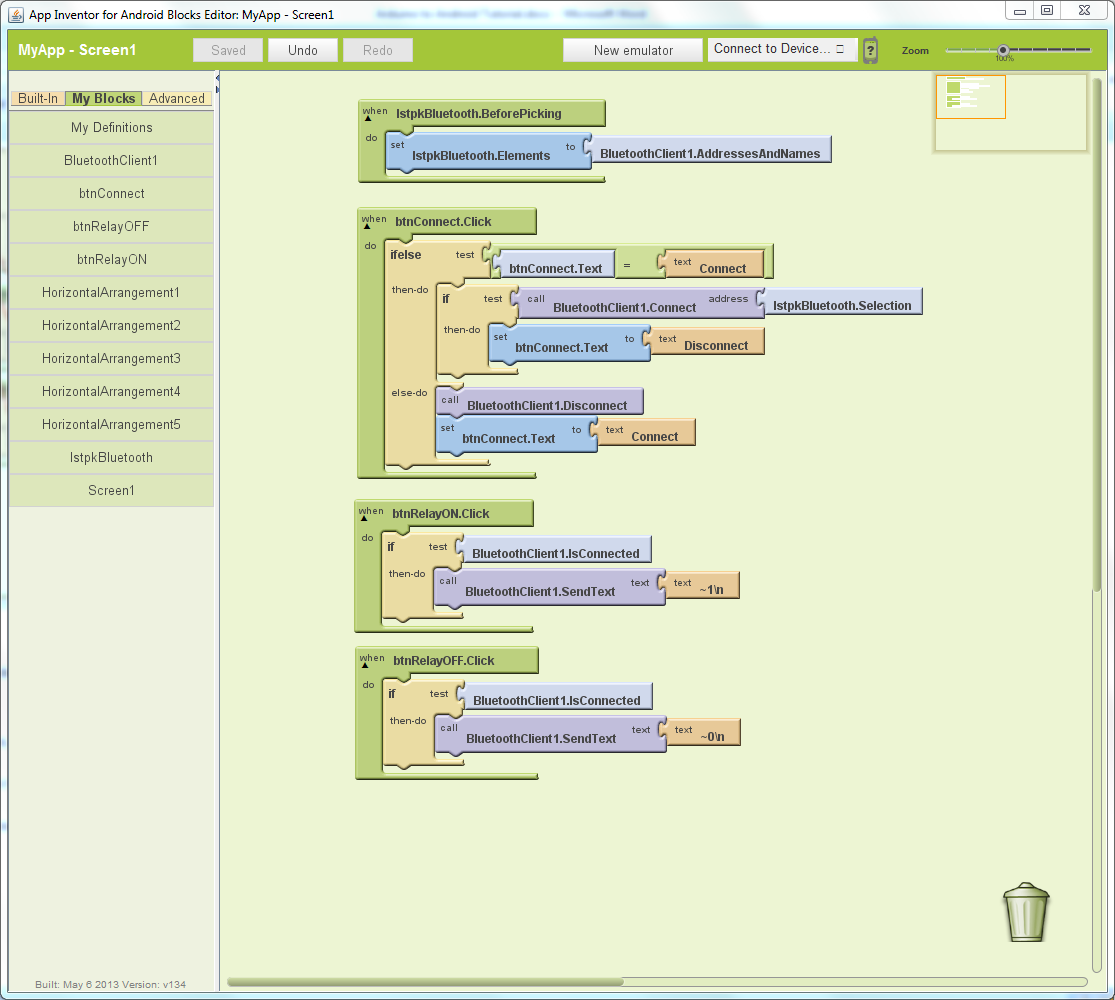
- Open the Block Editor and drag the blocks from the components and connect them as shown below.
- These Blocks list all the paired Bluetooth on the android device and allow us to select the one that you would connect to this application.
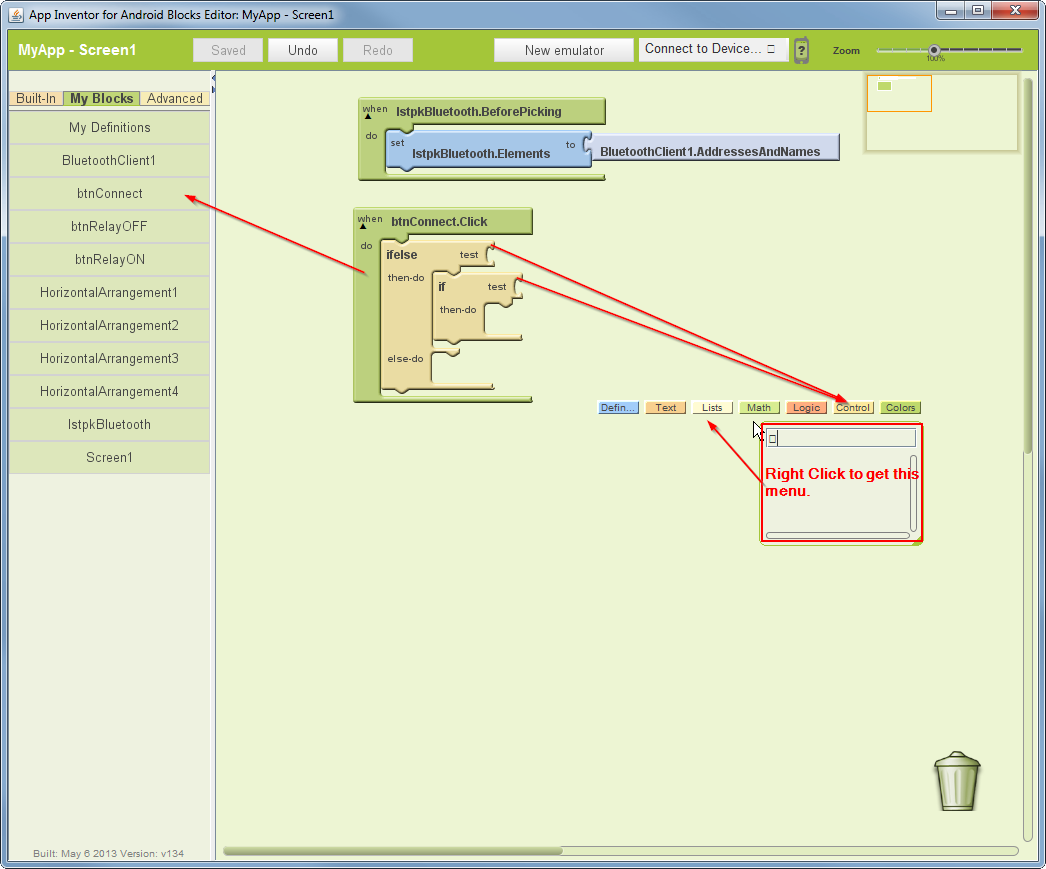
- To build the code that will connect the Bluetooth (that was selected from the above block of code) will create a block code that will check if the text on the connect button says “Connect” it will connect to the selected Bluetooth and set the text on the connect button to “Disconnect” and if it says Disconnect then it will disconnect the connected Bluetooth and set the connect button to “Connect” again.
Drag a btnConnect.click block and connect one if else and one if block from the control menu. Right click on code Area to get control menu. As shown below.
Set of blocks are accessed by right clicking on the code area. These include blocks for Defination, Text, List, Maths, Logic, Control and Color. To get more understanding of these block, have a look at the referance document link:
Knowing more about Blocks and how to use them
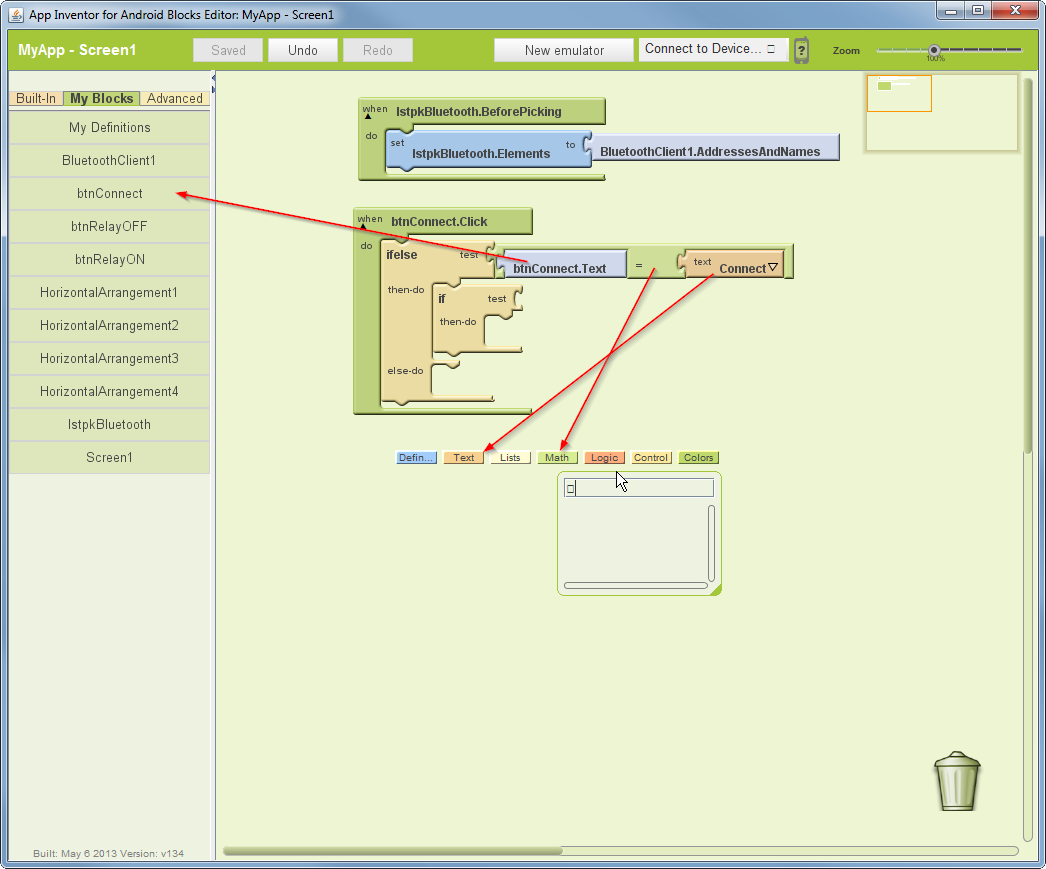
- Drag the blocks from the components show below. Change the text on the text block to Connect. The equals block is from Number menu and text block is from Text menu.
- Drag the others block and connect as shown below to complete this piece of code. Change the text on the text blocks as shown.

- Next code will send text (~1 for ON and ~0 for OFF) to the Arduino when the Relay ON and Relay OFF button is clicked on the app.When the Relay ON or Relay OFF is clicked, the code will check if there is a Bluetooth connect. If connection is there it will send text (~1 or ~0) to Arduino.~1 and ~0 are set as special text to trigger relay ON and OFF. \n is added to indicate end of line.
Drag the blocks and connect as shown below.
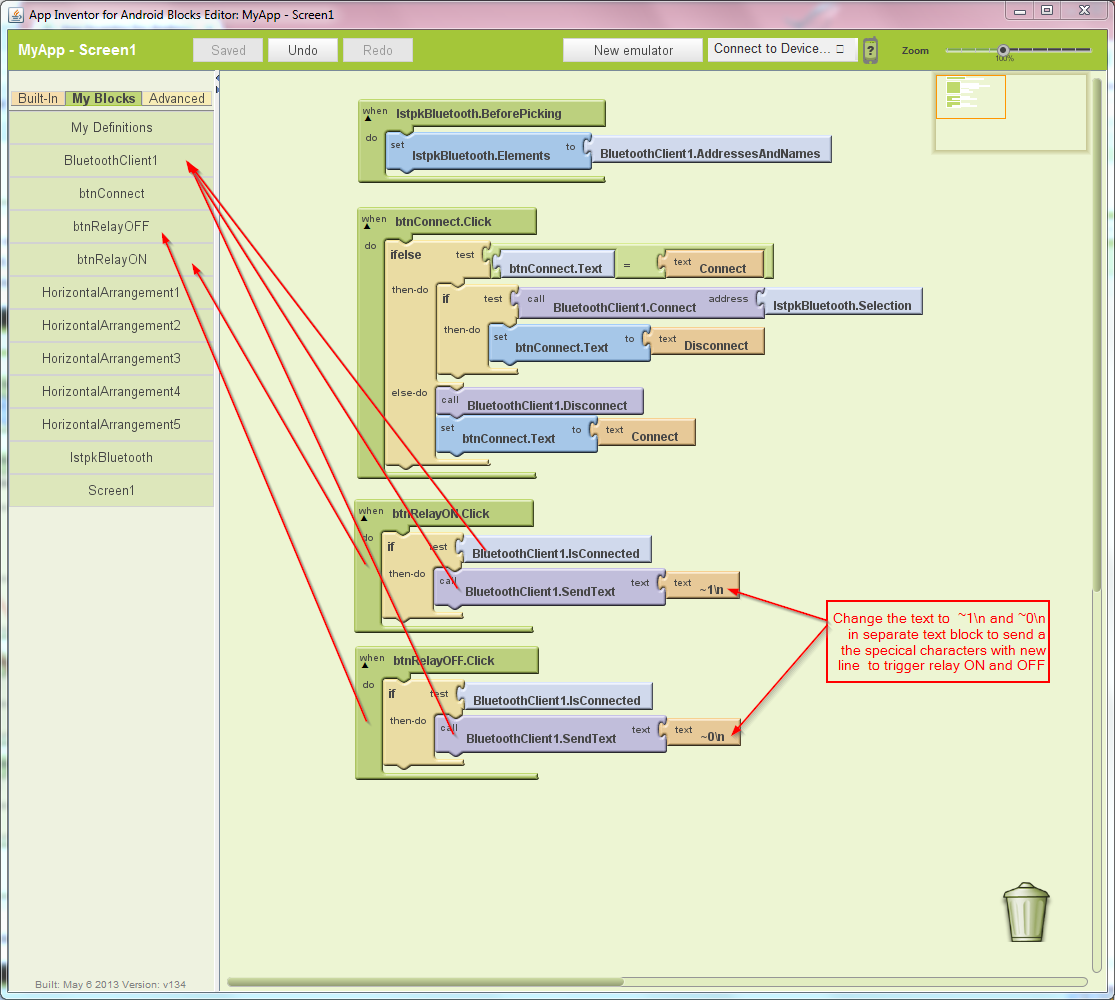
- This completes first part of code. Your code should look like as shown below.
- Time to test the App. Turn on the Arduino, make sure the the Bluetooth is connected and ON.
- Pair your android with the Bluetooth
- Start the App on the android and click the Select Bluetooth button. Select the paired Bluetooth from the list. There might be couple of them on the list depending on the number of paired Bluetooth on your android.
- Click Connect button
- Click on the Relay ON button. This should turn relay ON. Clicking the Relay OFF button will turn it OFF.
2. Send Message to OLED Display
- This is the continuous from above. This part will send data from android to OLED display connected to Arduino. Complete the above steps before continuing below.
Pin Layout
|
Arduino |
Bluetooth |
|
1 (TX) |
RX |
|
0 (RX) |
TX |
|
GRD |
GRD |
|
5 V |
VCC |
|
|
1 Channel Relay |
|
5 V |
VCC |
|
GRD |
GRD |
|
7 |
IN |
|
|
OLED Display |
|
5V |
VCC |
|
GRD |
GRD |
|
4 |
SDA |
|
5 |
SCL |
|
|
|
Arduino Code:
[ Arduino2Android_oled_setup.ino available on purchase]
OLED library needs tyo be installed before you start using it.
How to Install a arduino library
Android Bit:
3. Send Data to OLED Display
- In this part data will be sent from android to Arduino and show on oled display connected to Arduino.
- To archive this add a textbox field and button as shown below and also rearrange existed buttons.
- Add four Horizontalarrangement, a Textbox and a Button
HorizontalArrangement
- Drag a HorizontalArrangement and rearrange the Relay ON and Off inside the HorizontalArrangement
- Drag the second in-between the two Relay button and change the size to 5x5 pixel.
- Drag two above and below Textbox to create space. Change Height to 5 pixel.
Textbox
- Rename = txtMessage
- Width = 300 pixel
Button
- Rename = btnSenttoOLED
- Text = Sent to OLED
- Shape = rounded
- Height = 30 pixel
- Width = 150 pixel
Set the component as shown below:
Open Block editor and drag the blocks and connect it as shown below. This block of code sends the text on the app textbox as string to Arduino and display on OLED
When Bluetooth is connected and the clears the textbox for next data.

This completes part 2 of the tutorial. Load the arduino code and test your app by sending any message to OLED.
Part 4 - Adding Blutooth Pair Option and Application Changes