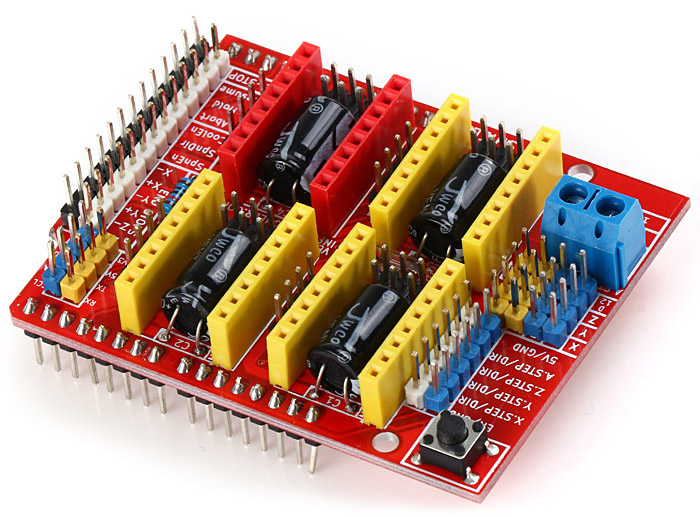
Arduino Shields

Image: 

Arduino CNC shield

Description: 

When you out building your CNC or a stepper control board, you want a well designed board which will house your stepper drivers and allow
easy configuration of parameters ( Example configuring the steps of stepper controller with jumpers ). This CNC shield is a well designed board which
takes the trouble out of doing your own hardware layout and allows you focus on just coding the Arduino.

The shield allows external power supply upto 36V for powering powerful motors, Also has the pins for setting up end stops, hold & resume operation.

CNC Shield Board: 

  • GRBL 0.9 compatible. (Open source firmware that runs on an Arduino UNO that turns G-code commands into stepper signals) 
  • PWM Spindle and direction pins 
  • 4-Axis support (X, Y, Z , A-Can duplicate X,Y,Z or do a full 4th axis with custom firmware using pins D12 and D13) 
  • 2 x End stops for each axis (6 in total) 
  • Coolant enable 
  • Uses removable A4988 or DRV8825 compatible stepper drivers 
  • Jumpers to set the Micro-Stepping for the stepper drivers. (Some drivers like the DRV8825 can do up to 1/32 micro-stepping) 
  • Compact design. 
  • Stepper Motors can be connected with 4 pin molex connectors or soldered in place. 
  • Runs on 12-36V DC. (At the moment only the DRV8825 drivers can handle up to 36V so please consider the operation voltage when powering the board.) 

Package includes: 

  • 1 x CNC Shield Board

Applications

  • CNC Laser engraver machine
  • PCB engraving machine
  • CNC router / milling machine
  • Robot Controls

Documents and Downloads

Additional addons which can be purchased:

Catalog: 

Price: $24.99

Arduino Joystick shield V2.0

Description: 

This is a great piece of uer interface board, it is perfect for gaming and navigating through menu quickly. It has headers for LCD and Bluetooth modules.

Catalog: 

Price: $28.00

Arduino 1602 LCD shield with keypad

Description: 

  Arduino LCD Keypad Shield

This is a 16x2 LCD and Keypad shield for Arduino Uno, Diecimila, Duemilanove and Freeduino boards.

  • Blue Backlight with white words
  • uses 4 Bit Arduino LCD Library
  • Left, Right, Up, Down and Select buttons
  • Screen contrast adjustment
  • Arduino Reset button

The board uses different pins to the Arduino example sketches, so to make the display work, use the following sequence of pins when starting the library:

LiquidCrystal lcd(8,9,4,5,6,7);

The buttons are connected to only one analog input pin through resistors to give a different voltage for each button, thus saving on input/output pins. Reading the buttons is easy and example code is shown below

Pin Connections

Pin Function
Analog 0 Buttons (select, up, right, down and left)
Digital 4 DB4
Digital 5 DB5
Digital 6 DB6
Digital 7 DB7
Digital 8 RS (Data or Signal Display Selection)
Digital 9 Enable
Digital 10

Backlit Control
HIGH = Backlight on

LOW = Backlight off
Use PWM signal to control brightness

Pin used:

Installing library:

Download and unzipped the library folder, and place it to the Arduino libraries directory. Once the library is correctly installed, the file structcture should look like:

arduino-0010/hardware/libraries/LCD4Bit_mod            
arduino-0010/hardware/libraries/LCD4Bit_mod/LCD4Bit_mod.cpp 
arduino-0010/hardware/libraries/LCD4Bit_mod/LCD4Bit_mod.h   
arduino-0010/hardware/libraries/LCD4Bit_mod/keywords.txt
arduino-0010/hardware/libraries/LCD4Bit_mod/examples    
arduino-0010/hardware/libraries/LCD4Bit_mod/readme.txt  

Open the example from file -> Examples -> LDC4Bit_mod -> LCD4Bit_modExample, as shown in the screenshot below.


The example should provide enough information to show you how to work with the LCD and all the 5 buttons.

Schematics download:

1602 LCD Shield Schematics


Lcd panel, display lcd, arduino to lcd, arduino lcd, lcd and arduino, lcd for arduino,lcd to arduino, arduino with lcd, character display, 

Catalog: 

Price: $29.99

Wiznet W5100 Ethernet Shield

Description: 

Great! This Arduino Ethernet Shield that is based on the Wiznet W5100 Ethernet Chip gives you an easy way to get your Arduino Online. It is directly supported by Arduino official Ethernet Library.

The Wiznet W5100 provides a network (IP) stack capable of both TCP and UDP. It supports up to four simultaneous socket connections. Use the Ethernet library to write sketches which connect to the internet using the shield.

Note: This ethernet shield is not compatible with the Arduino Mega. It is compatible with Arduino Duemilanove (168 or 328). However, if you want to use it with the Arduino Mega, this tutorial shows you how to do so. More discussion about this topic can also be found here.

It has a regular size SD card slot that allows you to make a mini-server. This is our example code to get you started.

The Ethernet shield uses SPI interface. On the Arduino Duemilanove and other ATmega168 / 328-based boards, the SPI bus uses pins 10 (SS), 11 (MOSI), 12 (MISO), and 13 (SCK). On the Arduino Mega, this is 50 (MISO), 51 (MOSI), 52 (SCK), and 53 (SS). Note that even if you're not using the SS pin, it must remain set as an output; otherwise, the SPI interface can be put into slave mode, rendering the library inoperative.

Power on reset issue:

This is an issue with the Ethernet shield that when it is powered on, the reset button has to be pressed to get the Ethernet shield working. This issue is not specific on this Ethernet shield, but exists in all variant of the Arduino Ethernet shields. The issue is caused by the fact that the normal reset time of the Arduino is too short. Unfortunately this issue cannot be solved by software. Below are the solutions to resolve this problem, you may choose one in your preference.

1. Solder a 100 nF (or thereabout) capacitor between the reset pin and GND, the good place to put it is between the reset button of the Ethernet shield. However, by doing this, the Ethernet shield has to be removed from the Arduino while downloading the program to the Arduino, otherwise you will get the following error

avrdude: stk500_getsync(): not in sync: resp=0x00

2. Clip off the reset pin of the Ethernet shield, and connect it with a wire to an unused i/o of the Arduino. So the reset of the Ethernet shield is independent to the Arduino. Before calling the Ethernet library,  enable that output pin, pull it low for 100ms, and then switch the port back to input mode with pullups disabled.

Catalog: 

Price: $39.99

Nokia Color LCD shield for Arduino

Description: 

For some applications a bit of color can make all the difference! Here you go, this is colored version of the Arduino LCD shield. It comes with three push buttons on the topper for user inputs.

Now you can run an interactive color application on the Arduino, taking the COOLNESS to a new level....

This 132x132 mini color LCD is a perfect match for the  portable application. Please be gentle with it and handle it with care.

This inexpensive LCD comes with a powerful white LED backlight and a relatively simple serial interface.

Frame Dimensions: 1.35x1.58"
Active Display Dimensions: 1.2"x1.2"

Features:

  • LCD Logic - 3.3V @ 2-3mA
  • LED Backlight - 7V @ 40-50mA (very bright)
  • Full 4,096 Color Display
  • Uses the Epson S1D15G10 or Philips PCF8833 Controller (we cannot guarantee which one you will receive, please see Jim Lynch's tutorial below as to why)

Documents:

Pin Out (use the numbering visible on the display connector):

  1. VCC-Digital (3.3V)
  2. RESET
  3. SDATA
  4. SCK
  5. CS
  6. VCC-Display (3.3V)
  7. N/C
  8. GND
  9. LED GND
  10. LED V+ (6-7V)

Catalog: 

Price: $45.00

Arduino SD Card Shield

Description: 

This SD card is a little stunning add-on that is great for your project. It allows you to expand the non-volatile memory of your Arduino device to, well, a few Gigabytes as of the current technology.

It is equivalent to adding a hard drive to your Arduino device. This extra memory is essential for data logging applications, where data is normally needed to transfer to a pc for post-processing.

This SD card shield connected to the Arduino by SPI interface. Multiple devices can use the same SPI interface to communicate with the Arduino as long as each of the device has their own chip select.

It supports both regular size SD cards and micro-SD cards, but only one can be used at a time. A small prototyping area is available some prototype holds for user to expand their circuit on the shield. Photo shows the top and bottom views of the shield.

Features

  • Arduino compatible 
  • Stand SD card and MicroSD card compatible
  • Prototype expand
  • Arduino footprint expand
  • Arduino Library support
Pin of Arduino With SD Card
5v VCC -> 3v3
GND GND
D13 SD_CLK
D12 SD_OUT
D11 SD_IN
D10 SD_CS

When use the Standard SD card libriary in Arduino IDE, please change the CS pin from 4 to 10, i.e., change

SD.begin(4) to SD.begin(10)

If you are not sure, please just download and run this SD Card Shield example code.

Note: SDHC is not supported

Link to the Arduino SD card library

Catalog: 

Price: $19.90

LCD Shield

Description: 

This LCD has a resolution of 84 by 48 pixels, with a blue back light. It can easily display six rows of fourteen alphanumeric characters, or two rows of six very large characters. Furthermore, it can display bitmap images that are appropriately sized.

It also has a 5 degree of movement Joystick, and a cool blue backlit LCD screen.

Making it easy to write up menus and click on them as you go. 
LCD shield give your project a Wow factor, last but not the least, it allows you to debug your programme while its running.... 

This demo sketch can get you started using this LCD shield.

The library can be downloaded from here

NOTE: this library doesn't work with Arduino 1.0 software, please use Arduino software version 0022 or 0023.

First unzipped the LCD4884Lib.rar, then copy the sub-directory "LCD4884" and paste it to the directory "libraries" under the Arduino software directory.
Then launch the Arduino software, files -> examples -> LCD4884->LCD4884_menu
 

Specification

  • Power Supply: 5V
  • SPI Interface (using Arduino Digital Pin 2,3,4,5,6)
  • One Reset button
  • One 5 degree joystick (using Arduino Analog Pin 0)
  • Backlit control (Arduino DIO Pin 7)
  • Image generation library: Image2Code


Catalog: 

Price: $35.00

Arduino Motor Shield

Description: 

The Arduino Motorshield is the missing link for making a robot with the arduino. This Arduino Motorshield allows you to connect 2 DC motors and have total control of them from the arduino.

It allows you to move each DC motor
- Clockwise
- AntiClockwise
- Stall
- Control motor speed

This motor shield allows Arduino to drive two channel DC motors. It uses a L293P chip which
deliveries output current up to 2A each channel. The speed control is achieved through conventional PWM which can be obtained from Arduinos PWM output Pin 5 and 6.

Specs:
Peak Output Current (each Channel)
- Non Repetitive (t = 100ms): 3A
-Repetitive (80% on -20% off; ton = 10ms): 2.5A
-DC Operation: 2A
Analog voltage input: VIN 6.5-12V PWRIN 4.8-24V 
Digital voltage input: VD = 5V (7V max)
Max power dissipation: 25W

See  Motor Shield Tutorial for details of how to use it.

Catalog: 

Price: $44.99

Arduino Servo and Sensor Shield v5.0

Description: 

You can easily connect with usual analog sensors by using this expansion board, such as temperature sensor. Those 3-way male pins allow you to connect servo motors.

Everything is plug and play, and it's designed to be Arduino Duemilanove compatible. So all you need to do is to read the data from the sensors and output PWM to drive the servos by program in arduino.

This is the latest version of sensor shield in the market. The major improvement over its predecessor is the power source.

This version provides an external power connector so you don't need to worry about overloading the Arduino microcontroller while driving too many sensors and actuators.

Catalog: 

Price: $28.00

Ethernet shield for Arduino & get it on2 internet

Description: 

Cool projects you can do with this ethershield:

  •  Read Google news from Arduino
  •  Host a web page in the Arduino
  •  Follow twitter messages of your friends, with no PC, But just a Arduino and Internet!!!!

This shield connects 2 powerful things The Arduino + The Internet = AWESOME!!!!!

The projects you can do with this shield is only limited by your imagination.

CD contains examples how to use it!! That way you get it going in a few minutes....


Note: This ethernet shield is not compatible with the Arduino Mega. It is compatible with Arduino Duemilanove (168 or 328). However, if you want to use it with the Arduino Mega, this tutorial shows you how to do so. More discussion about this topic can also be found here.


Catalog: 

Price: $39.99

Pages

Zircon - This is a contributing Drupal Theme
WeebPal