Sensors

Image: 

Load Cell 100kg : S type

Description: 

Overview

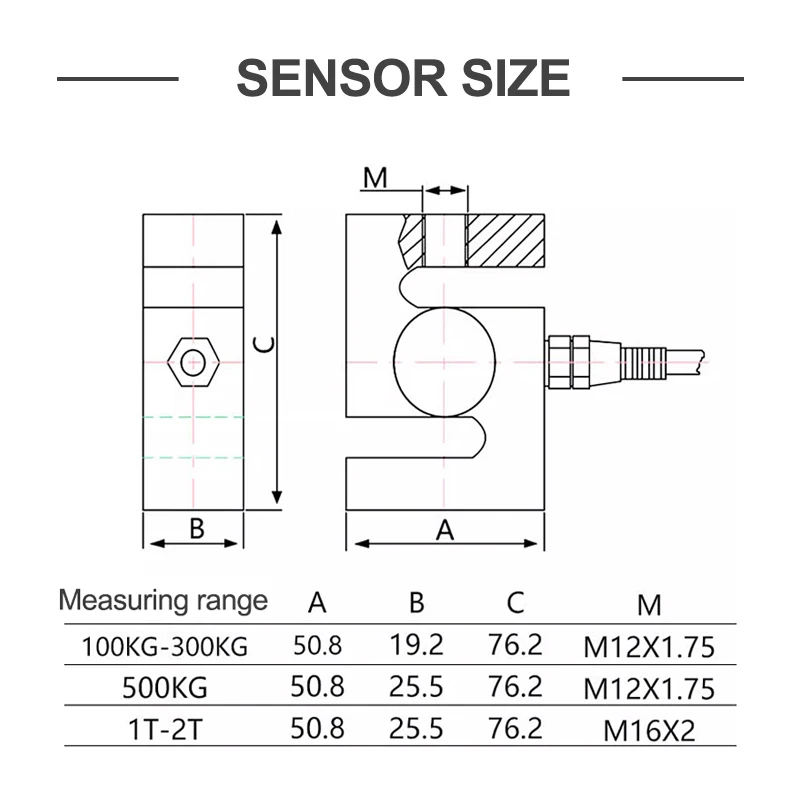
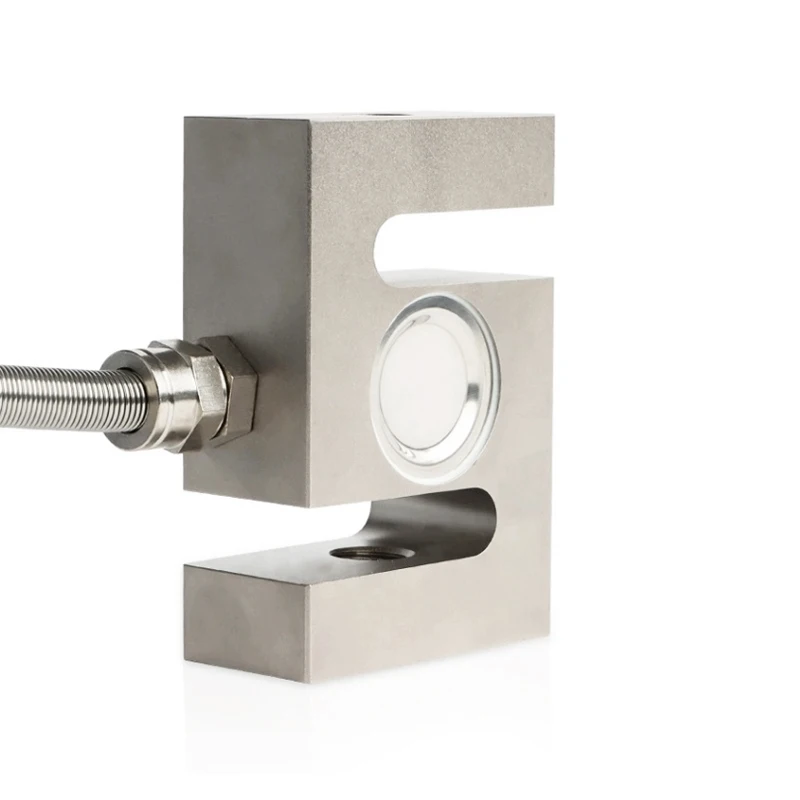
This High Capacity Compression Load Cell is an essential component for precise force measurement in a wide range of industrial and laboratory applications. Its versatility makes it ideal for electronic scales, crane scales, hopper scales, and various specialized measuring setups. The S-type load cell provides excellent tension and compression measurements, featuring good output symmetry, compact structure, and ease of installation. It's designed to accommodate a full range of capacities, making it suitable for small scale to large scale weighing needs.

Key Features

  • Type: S-Type Load Cell for tension and compression measurements.
  • Capacity Range: Available in capacities of 100kg, 200kg, 300kg, 500kg, 1T, and 2T, catering to a broad spectrum of weighing requirements.
  • Sensitivity: 2.0mV/V, ensuring precise and accurate readings.
  • Hysteresis: ≤0.3%F.S, minimizing errors in measurement repeatability.
  • Non-linearity: ≤0.3%F.S, guaranteeing accuracy across the measuring range.
  • Relative Creep (30 min): ≤0.3%F.S, providing stability over time.
  • Temperature Influence on Sensitivity: ≤0.02%F.S/10℃, ensuring reliable measurements across different environmental conditions.

Advantages

The High Capacity Compression Load Cell offers several advantages over traditional measuring methods:

  1. Versatility: Can be used in various applications, from industrial weighing to laboratory force measurements.
  2. Accuracy: High sensitivity and minimal hysteresis and non-linearity ensure precise measurements.
  3. Ease of Installation: The compact and symmetrical design allows for straightforward installation in multiple configurations.
  4. Temperature Stability: Low temperature influence on sensitivity allows for consistent performance in varying conditions.

Applications

  • Electronic Scales: Ideal for high precision weighing scales.
  • Crane Scales: Suitable for measuring loads in crane operations.
  • Hopper Scales: Perfect for industrial batching and weighing processes.
  • Specialized Scales: Can be used in custom applications requiring precise tension and compression measurements.

Package Contents

  • High Capacity Compression Load Cell: Your chosen capacity (100kg, 200kg, 300kg, 500kg, 1T, 2T).
  • Installation Guide: Detailed instructions for easy setup and use.

Frequently Asked Questions

Q. What makes this load cell suitable for various scales?

A. The S-Type load cell is versatile due to its ability to measure both tension and compression with high accuracy, making it suitable for a wide range of applications.

Q. How does temperature affect the load cell's performance?

A. The load cell is designed with minimal temperature influence on sensitivity, ensuring consistent performance across a wide range of environmental conditions.

Q. Can this load cell be used for heavy-duty applications?

A. Yes, with capacities ranging up to 2 tons, it's ideal for both light and heavy-duty weighing applications.

Q. Does the loadcell come with test certificate?

A. Yes, the loadcell comes with a dated test certificate from manufacturer

Q. I want a different loadcell from 100Kg, do you stock it?

A. Yes, we do have different capacity loadcells available. Please get in touch via email to contact@hobbyist.co.nz for options.

Catalog: 

Price: $179.99

Arduino Flow meter

Description: 

YF-S201 Hall Effect Water Flow Sensor

This YF-S201 Water Flow Sensor is designed with a 1/2” plastic pipe that incorporates a wheel. The wheel rotates with the flow of water. A Hall Effect Sensor is integrated with the wheel. When the wheel revolves, the Hall Effect Sensor generates an electrical pulse. The number of electrical pulses varies with the flow of water. Each pulse stands for approximately 2.25 milliliters of water. The number of pulses is determined using a microcontroller. 

YF-S201 Hall Effect Water Flow Sensor

Specs of YF-S201 Hall Effect Water Flow Sensor:

  • 1 to 30 Liters/Minute flow rate measurement
  • Liter(s) per minute = Number of Pulses / 7.5
  • 10% tolerance
  • 4.5-18V DC input voltage
  • 5V TTL Signal
  • -25°C to +80°C temperature range
  • 35% to 80% humidity range
  • 50% to -10% output duty cycle range
  • 2.0MPa maximum water pressure
  • 0.04us output rise time
  • 0.18us output fall time
  • 450 pulses per liter of flow
  • 1/2” pipe connection
  • 2.5” x 1.4” x 1.4” dimensions


Wiring the Flow Sensor with Arduino:

YF-S201 Hall Effect Water Flow Sensor Wiring

Connect all pins as following

  • Red Wire with +5V pin of Arduino Board
  • Black Wire with the GND (ground) pin of Arduino
  • Yellow Wire with a Digital pin of Arduino (preferably pin 2)


Package Contains:


Applications:

YF-S201 Hall Effect Water Flow Sensor Application

This Water Flow Sensor can be used in automation applications where liquid flow rate measurement is needed e.g it can be used for monitoring and controlling the rate of water flowing in the water tank, water dispenser, and coffee machine. It can also be used for the development of automated plants watering system.


FAQ:


1. What is the maximum flow range of this sensor?

YF-S201 supports up to 30 Liters of water per minute.


    2. What is the tolerance level of this sensor?

YF-S201 has 10% tolerance.


    3. Is this sensor easy to use for hobby projects?

Yes, YF-S201 is easy to use and its compatibility makes it easy to sync with common microcontrollers such as Arduino Boards.


4. What is the life expectancy of this sensor?

YF-S201 operates for more than 300,000 cycles


    5. Is this sensor suitable for high-temperature applications?

YF-S201 sensor operates below +80°C temperature.


6. How do I connect YF-S201 Flow Sensor with Arduino Board?

We have a detailed tutorial which shows how to connect this sensor and read the data, it can be found here:

https://www.hobbyist.co.nz/?q=arduino-with-YF-S201-flow-meter


Catalog: 

Price: $39.99

Power Meter

Description: 

Product Description:

Overview:

The Power Meter is a handy energy saving tool that delivers 230V-250V, 10A max Energy that is easy to setup and use. It's designed for the energy conscious individual who values savings and efficiency. The Power Meter is an affordable programmable tool that can save electricity to make you more proactive in saving valuable resources.

The large and clear LCD display shows volts, amps and wattage accurately. Easy to operate function buttons allow easy scrolling through various screen readings that include KW consumption in real time, as well as HI and LO values, total KWh, supply voltage and frequency. It's a great tool for monitoring individual household appliances to determine consumption cost just by operating them.

The Power Meter's heavy-duty and compact body ensures durability, even with continuous use. It has AU/NZ plug compliant to work in NZ and AUS.

This product is used by lot of academic institutions and businesses in nz.


The 8 display modes are as follows:

a. Time/Watt/Cost Display

b. Time/Cumulative electrical quantity Display

c. Time/Voltage/Frequency Display

d. Time/Current/Power Factor Display

e. Time/Minimum Power Display

f. Time/Maximal Power Display

g. Time/Price Display

h. Overload Display


Specification:

-Power consumption: 0.5W
-Operating voltage: 230VAC
-Frequency display: 50HZ
-Operating current: max 10A
-Wide voltage range: 230V-250V
-Wattage display (Watts): 0-2900W
-Timing display range: 0 second-9999 days
-Voltage display (amps): 0V-9999V
-Current display (amps): 0.000A~13.000A
-Frequency display: 0Hz-9999Hz
-Price display range: 0.00COST/KWH¡«99.99COST/KWH
-Total KWh and cost display: 0.000KWh-9999KWh, 0.00COST----9999COST
 

Package contains:

1X Power Meter
1X English User Manual

Applications:

  • For monitoring and testing instrument and household appliances.
  • Determines the cost of electricity consumed.

Here are some ways you can use the Power Meter around your home or workplace:

Use the Power Meter to find out the power consumption of the following electrical appliances such as: computers, television, HIFI systems, printers and scanners, among others.


For the cost-saving person, the power meter works seamlessly to show your power consumption in real time. Keeping a tab on your electrical expenses is so simple using this amazing electrical gadget.


All energy-efficient homes need the Power Meter. To conserve energy and resources, this gadget is a must-have.


Operating Instructions:

Connecting Appliances:

1. Plug the power meter into the main electrical socket.

2. Plug the appliance you wish to monitor into the front socket of the power meter.

3. Switch the main socket power switch to "ON".

4. Use the appliance as you normally would.

The Power Meter will now measure the energy used by the appliance.


Setting the Time

1. Press and hold the “CLOCK” button for 3 seconds.

2. With the hour digit flashing, press “UP” repeatedly until the correct hour is reached; Time is always displayed using the 24 hour clock, so 2:00pm must be entered 14:00 for correct operation.

3. Press the “SET” button to accept the hour selection.

4. With the minute digits flashing, press “UP” repeatedly until the correct hour is reached.

5. Press the “SET” button to accept the minute selection.

6. Wait 10 seconds, or press the “OK” button to finish setting the time.

Setting the Tariff (cost per kWh)

1. Press the COST button for 3 seconds to enter cost mode.


2. There are 4 currencies that you can choose to have your charges display as: (money symbol); £ (pound); $ (dollar) or € (euro). Press the UP button to cycle through the symbols and press OK to confirm your selection.


3. The Power Meter features a dual tariff system, that is, you can have 2 different tariff rates for 2 periods of the day. This is useful if you have a peak and off-peak energy billing system.


4. Press the UP button to choose between a single tariff (Tariff 1 will be displayed on the LCD) or dual tariff (DUAL TARIFF will be displayed onthe LCD). Press OK to confirm your selection.

  • If you choose a single tariff you will only be asked to enter 1 rate.
    Set the rate using the UP button in the range of 0.00 – 9999COST/
    KWH. Use the SET button to navigate between the digits. Press the
    OK button to confirm your selection. When you have finished setting
    the rate, press the COST button to save your settings.
  • If you choose Dual Tariff, the tariff you are current editing will be
    highlighted on the display as either Tariff 1 or Tariff 2. You can cycle
    between the two by pressing the SET button.


5. Set the rate using the UP button in the range of 0.00 – 9999COST/KWH.
Use the SET button to navigate between the digits. Press the OK button
to confirm your selection.


6. Set the time the tariff will begin using the UP button, the first 2 digits are
for hours (range 0-23), the second 2 digits are for minutes (range 0-59).
Use the SET button to navigate between minutes and hours. Press OK
to confirm your selection.


7. Once you finish the tariff settings for Tariff 1 you will be asked to enter
the details for Tariff 2 using the same steps as above.


8. When you have finished all the settings, press the COST button to save
all your settings.

FAQs:


Q: Can I know how much in dollars a device (e.g. fridge) is using?

A. Yes, you can. Just set the tariff (cost per KWH) as indicated above.

Q: How can I reset the power meter reading??

A. Using a paperclip or a pencil, press down the Reset button and hold it for around three seconds to reset.


Q: Why is my Power Meter isn’t counting the energy usage?

A. The Power Meter will not start counting energy usage unless the plugged in device is using more than 2W of energy.

Q: Can I use the power meter to monitor many devices?

A.Yes. You can do so by connecting the Power meter to a power strip.


Price: $59.99

Sound level - Decibel Meter

Description: 

This Decibel Meter is ideal for measuring sound levels  from 31.5Hz to 8KHz. Its powered by 3 x AAA Batteries and is compact and easy to carry.

The measuring range of this device is 30 - 130dbA with an accuracy of +/- 1.5dB.

It comes with a sound sock and manual for operating instructions.


Applications:

  • Determining exhaust decibels of vehicles
  • Car audio installers
  • Audio level and sound planning for Clubs and public addressing
  • Noise Testing for equipment 
  • Road traffic noise sensing
  • Sound barrier effectiveness testing
  • Environmenal noise
  • Factory machinery noise
  • Stereo equipment testing

Specifications:

Measuring Range: 30~130dBA

Accuracy : ±1.5dB

Frequency Response: 31.5Hz~8KHz

Frequency Weighting Features: A Weighting

Resolution: 0.1dB

Working Temperature and Humidity: 0~40degree,10~80%RH

Storage Temperature and Humidity: -10~60 degree ,0~90%RH

Power Source : 3*1.5V AAA Batteries ( not included )

Weight: 84.08g(Excluding Battery )

External Dimension:50*33*159.5mm

Sound level meter, decibel meter, sound meter, noise meter, spl meter, noise level meter, noise scale db, db tester app, 85 db noise level, 48 db noise level, db table, sound level meter software, decibel levels, decible, noise control is a problem, decibel meter is needed to measure the levels, sound test is the industry reccomended approach.

Catalog: 

Price: $45.99

X-Y Joystick

Description: 

Overview:

The X-Y Joystick for Arduino is a compact dual axis module combining an analogue X, analogue Y and digital press switch control for your Arduino project.  The module provides a gamepad style joystick that interfaces through a 5 pin header, and gives a tactile feedback from the switch when the joystick is pushed down.

Specifications:

Dimensions: 4cm(l) x 2.6cm(w) x 3.2cm(h)

2 Potentiometers (for X and Y axes), 1 switch (vertically operated)

Connection: +5Vcc, Gnd, VRx, VRy, Sw.


Package Contains:

1 X-Y Joystick module.


Applications:


Limited only by your imagination, typical applications could include control of robotics, cameras, CNC type projects, or volume and brightness controls.


FAQ:

Could I use this as part of a security or monitoring system?

Yes; it is ideally suited for such applications, allowing pan and tilt control, and the switch could be used to take a still shot, or to start and stop recording.


How could it be used for CNC, or in the workshop?

By using it as an interface for your project, connected to stepper motors this joystick would allow manual control of machinery.


Can I use it for a robot or turtle type project?

Absolutely; you could almost say that it was designed for just such applications.  The push button switch could be configured in software to toggle, for example, lights or a plotter style pen, or could activate a horn or buzzer.


I've heard that joysticks can be difficult to clean.  Does that apply to this product?

The rubber knob detaches from the board, providing full access to the potentiometers so that a proprietry contact cleaner aerosol has unimpeded access, should you choose to use this in a dusty environment.  In such situations, however, environmental shielding is still recommended.


What about mounting?

The module is pre-drilled at each corner to ensure that it can be robustly mounted however you choose.

Catalog: 

Price: $17.99

Wifi Datalogger and monitoring system

Description: 

We have built a new version with a better price, you can check it here

Wifi DataLogger with long battery life


Industrial and commercial projects need constant monitoring of sensors and collection of data in a format which is readily accesible and can be visualized with ease. For solving this problem we have developed a Datalogger and monitoring system which works over Wifi.

  The beauty of this system is its entirely self sufficient, Does not need an existing wireless network. It simply creates its own Wifi access point and
the you can connect to it simply with a PC, android or Iphone.


What does this mean:

This means the user is able to monitor the temperature sensors connected to the datalogger in these simple steps

1. Smart phone (iphone, android ) or your PC sees "DATALOGGER" wifi network, simply connect to it.

2. Download the logged data in the format of Excel readable CSV files

3. See live graphs by clicking following this URL.


This device can be used for monitoring temperature for soil, industrial monitoring systems, vineyards etc. We do provide support to add different type of sensors to cater for other datalogging uses.


What comes with the purchase:

  • Datalogger
  • 2 x Temperature sensors (water proof,  -25 - 125 DegC range)
  • 5v Power adapter


FAQ:

1. Can this Datalogger connect to other sensors other than the ones which comes with it ?
A. Yes, we already have support for K type thermocouples ( works upto 500 Deg C ) as well as others, just contact us and post your needs we can get it working for you.

2. Will this sensor work in places with no Wifi coverage?
A. Yes, Since this device creates its own Wifi network, it can work in areas where there is no wifi coverage.

3. How does the graph look like?
A. The graphs would have the same look and feel as this one ( NOTE: For the datalogger the data would be 2 Temperature series lines )

4. Can I see a sample of the Excel readable file which the datalogger creates? 
A. This sample CSV file was created by the logger. You can download it and view it in Excel. ( or openOffice ) 

3. Can I get you to add more temperature sensors of the same type to this logger ?
A. The standard package comes with 2 Temp sensors ( -25 - 125 DegC range),  for sure we can add more sensors to the Logger for a small cost.

4. Does this device need any assembling or is this a plug and play device ?
A. This is a plug and play device with no assembling required. You just have to power it and it should just work out of the box.

5. How do I view the graphs once the Datalogger is powered up ?
A. From your Mobile/PC connect to the Wifi network called 'DATALOGGER'. Once connected you can view the graphs by
    accessing this link http://192.168.10.1/sensorframework/graph/graph.html

wifi temperature sensor, wifi temperature monitor, wifi temperature monitoring, temperature sensor wifi, home temperature monitor wifi, wifi temperature sensors, wifi temperature probe, remote temperature sensor wifi, temperature alert wifi, wifi sensors temperature, temperature monitor wifi, remote temperature monitor wifi, temperature wifi, wifi home temperature monitoring, arduino wifi temperature sensor, wifi data logger, wifi logger, data logger wifi, wifi temperature logger, temperature logger wifi, wifi temperature data logger, temperature data logger wifi, wifi data loggers, datalogger, wifi thermometer, wifi thermometer sensor, thermometer wifi, thermometer wifi sensor, wifi thermometers, wifi enabled thermometer, wifi thermometer iphone, wireless thermometer wifi, wifi pool thermometer, wifi remote thermometer, thermometer with wifi, data logger, data loggers, data logger software, wireless data logger, current data logger, portable data logger, solar data logger, electrical data logger


Price: $395.00

Wind speed measurement tool : Anemometer

Description: 

Laser distance meters, first brought to the market by Leica Geosystems in 1993 in France, have become indispensable tools in a variety of industries including construction, renovation, sports, and real estate. Offering a modern alternative to the traditional tape measure, these devices have revolutionized measurement practices by enabling single operators to quickly and efficiently measure distances.

Utilizing a laser measuring tool eliminates the need for a second person to hold the end of a tape measure, allowing for a hassle-free and streamlined process when measuring large objects or distances, such as the dimensions of a room. Moreover, it prevents the necessity for a clear, unobstructed line across the measurement path, thus providing greater flexibility in the measuring process.

Although tape measures may offer higher accuracy in some cases, laser measuring tools come with the added advantage of being able to be calibrated to achieve generally reliable results across a series of measurements.

These user-friendly devices not only grant the ease of switching between imperial and metric units but also come equipped with features that facilitate the computation of areas and volumes directly. Hence, they offer an integrated solution to measurement needs, giving users the power to perform a wide range of calculations effortlessly and promptly.

Investing in a laser distance meter can therefore translate into a smart choice for professionals in several fields, offering a combination of convenience, speed, and versatility that traditional measuring tools simply cannot match.


Features:
  • Measure wind speed and temperature.
  • High precision pressure sensor.
  • Quick response, external thermistor.
  • Wind speed reading.
  • Wind speed unit: m/s, Km/h, ft/min, Knots, mph.
  • FPM (foot per minute, ft/min ): 160
  • Resolution Ratio: 19.6 ft/min
  • Current/max/average wind speed reading.
  • Temperature display in °F/°C.
  • Wind temperature range: -10 - 45°C (14-113°F)
  • Data hold function.
  • Auto/manual power off.
  • Powered by a 9V 6F22 battery.
Specifications:
Air Velocity:
  • Range: 0 - 30m/s, 0 - 90km/hr, 0 - 5860ft/min, 0 - 65mph(±5%), 0 - 55Knots
  • Resolution: 0.2°C, 0.2m/s
  • Auto power off 14 minutes without any operation
  • Accuracy: ±5%
Air Temperature:
  • Range: -10 – 45°C, 14 – 113°F
  • Resolution: 0.2°C, 0.36°F
  • Accuracy: ±2°C, ±3.6°F
  • Thermometer: NTC Thermometer
  • Operating Temperature: -10~+45°C (14~113°F)
  • Power Supply: one 9V 6F22 battery ( not included )
  • Operating Humidity: less than or equal to 90%RH
  • Storage Temperature: -40~60°C, -40~140°F
  • Current Consumption: About 3mA
  • Item Size: 52.5x35.5x160 mm
  • Weight: 187g

Weather stations, wind meter, anemometer handheld, hot wire anemometer, anemometers, handheld, thermometer, wind vane, what is an anemometer, wind speed meter, wind meter, davis weather station, wind vanes, how to make an anemometer, wind gauge, oregon scientific

Price: $69.90

2 x PIR Motion sensor

Description: 

This PIR sensor can be used for motion detection, either to detect human movement or pets. It works by taking a snapshot of the infrared signature of the room and gets triggered when it detects a change. Its pretty sensitive and is typically used in most intruder detection systems.


 It has a configurable trigger ON time as well as a configurable sensitivity, which allows you to set it such that it does not trigger for pets but does trigger for humans.


Specs

Supply voltage from 4.8V-20V

static current:<50uA

Level of output: high 3.3V/low 0V

triggered way:L not repeatable triggered/H repeatable triggered (default repeatable triggered)

Delay time:0.5-200s(adjustable)

Blocking time:2.5s(default)

Circuit board dimension:32mm*24mm

Angle of induction:<100 degree Cone Angle

Working temperature:-15C to +70C

Induction lens size: Diameter: 23mm (default)


2 x PIR sensors in this package ( $12.99 each )

Catalog: 

Price: $25.98

2 x AC Current Sensor SCT-013-030

Description: 

2 x Non-invasive AC current sensor SCT-013-030 30A Split Core Current Transformer. Ideal for energy monitoring and machine automation.


Included are 2 AC current sensors $19.99 each.


Core Material: Ferrite
External Material: Plastic
Input Current:0A-30A
Opening Size:13 x 13mm
Output Plug:3.5mm
Dielectric  Strength:6000V AC/1min
Working Temperature:-25-70°C
Anti-flaming rate:UL94-V0
Mechanical strength:>500(20°C)

Datasheet Link

How to use the Current sensor and the input current to sensor current ratio table


Catalog: 

Price: $39.98

2 x DHT22 high precision temp and humidity sensors

Description: 

DHT-22  is a low cost high precision humidity and temperature sensor with a single wire digital interface.
The sensor is pre-calibrated and doesn't require extra components so you can get right to measuring relative humidity and temperature.

Features:
  •  2 x DHT22 sensors     
  • 3.3 - 6 V Input
  • 1-1.5 mA measuring current
  • 40-50 uA standby current
  • Humidity from 0 - 100 % RH
  • -40 - 80 degrees C temperature range
  • +- 2 % RH accuracy
  • +- 0.5 degrees C
  • 20 m max wire length

DHT 22 Datasheet

FAQ

1. What length of wires can we use for connecting the DHT22 sensor?

A. Upto 20M length wire can be used when wiring the DHT22 sensor.

2. What is the difference between the DHT11 and DHT22 sensor?

A. The DHT22 is a superior sensor as it has resolution of 0.1 Degrees and better accuracy compared to the cheaper DHT11 sensor.

3. Is a pull up resistor recommended for DHT22 signal line?

A. A pullup resistor of 4.7K is recommended to be connected to the signal line and VCC pin to improve signal integrity. If you are seeing many failed reads, having this pull up will help.

Catalog: 

Price: $31.99

Pages

Zircon - This is a contributing Drupal Theme
WeebPal