DC motor is very simple to operate, you power it and it rotates in one direction and if you change the polarity of the power it rotates in the opposite directions
Advantages of DC motor
- Low cost
- Easy to get going, all you need is a power supply
- High RPM ( High speed )
Disadvantages
- Low Torque: Not practical to use it the drive a toy without gears
- Position control is not possible
- Low speeds are difficult to achieve
Servos, have few advantages over DC motors:
- High Torque
- Low speed
- Precision control
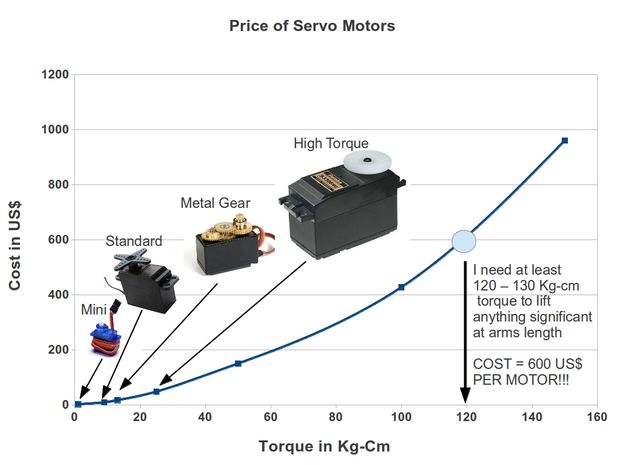
One problem with servos is that they cost a lot more than DC motors.
How to convert a DC motor to a Servo motor:
The basic idea behind converting a DC motor to servo is to find the position of the shaft and apply a DC voltage to get the Shaft to the expected position.
The below diagram illustrates the idea:
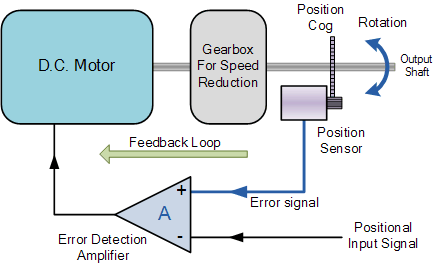
Controlling a DC motor in Servo mode:
Items required
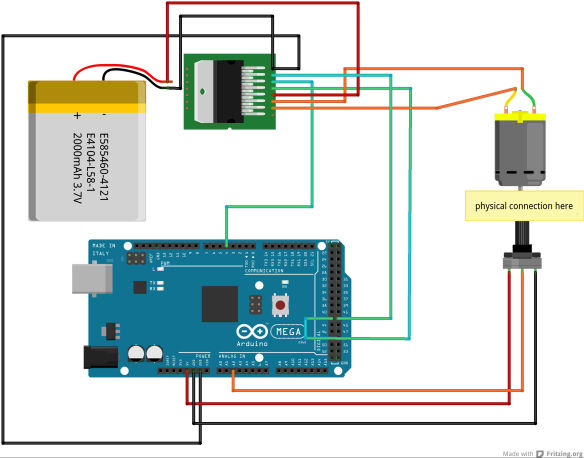
Ref: http://www.instructables.com/id/DIY-Servo-Motor/
//Arduino code to control angle of a motor shaft using a potentiometer for feedback
//Please use a low rpm motor. Not more than about 500 rpm.
//******POTENTIOMETER SETUP *************
//1. Fix the shaft of the potentiometer to the motor shaft.You might like to use a slightly flexible coupling
//to do this, otherwise even a slight misalignment may cause trouble.
//2. Fix the body of the potentiometer to a rigid surface such as the body of the motor,//so that when the motor shaft turns, only the potentiometer shaft turns with it.
//3. Now we can read the potentiometer value to get the angle of the motor shaft//Look at my youtube video to see how I did this. In my video, I fixed the BODY of the potentiometer//to the motor shaft. It will be better to fix the SHAFT of the potentiomter to the motor
//shaft if you can do it properly
//Fix santa's hand to the motor shaft so that it does not interfere with the potentiometer movement
intpotPin=5;
//we will read the potentiometer value on analog pin 5
//**********************************************
//*****ANGULAR CONSTANTS********
#definePOT_VALUE_MAX700
// potentiometer reading when motor shaft is at 180 degree position.
//You will need to fill this value according to your setup.See below....
#definePOT_VALUE_MIN200
//potentiometer reading when when motor shaft is at 0 degree position.
//You will need to fill this value according to your setup.See below....
//To fill up the correct values, first turn the motor shaft manually to 0 degree position.
//Now read the potentiometer value and edit the #define POT_VALUE_MIN line with your pot reading.
//Next manually move the motor shaft to 180 degree position,
//read the pot value and edit #define POT_VALUE_MAX line with your pot reading.
#definePERM_ERROR3//the max permissible error in degrees. In my potentiometer, a turn only about 3 degrees
//on the potentiometer shaft causes any real change in the ohmic reading. You can adjust this error
//value as required. If PERM_ERROR is very small, the shaft will keep hunting left and right as the//analogRead() of the potentiometer pin keeps fluctuating slightly
#defineMAX_ANGLE180//we will allow our motor to turn by a maximum angle of 180 degrees
//**********************************
//Now we define a class that will control our DC motor....
//This motor must be running from a H bridge like L298 IC
//********************************************************************
classDCMotor{
private:
int M_pin1,M_pin2,M_PWMPin;
int M_Speed;
int turnDirection;
enum turnDirection{right,left};
public:
DCMotor(int p1,int p2,int p3)//Constructor
{
M_pin1=p1;//direction pin on L298
M_pin2=p2;
//direction pin on L298
M_PWMPin=p3;
//PWM pin on L298
pinMode(M_pin1,OUTPUT);
pinMode(M_pin2,OUTPUT);
}
void SetTurnDirection(intdir)//Setting turn directions on L298 IC
{
turnDirection=dir;
switch(turnDirection)
{
case right://turning Right
//motor moves CW
digitalWrite(M_pin1,HIGH);
digitalWrite(M_pin2,LOW);
break;
case left://turning Left
//motor moves CCW
digitalWrite(M_pin1,LOW);
digitalWrite(M_pin2,HIGH);
break;
}
}
void SetTurnSpeed(ints)
{
M_Speed=s;
}
void Turn()
{
analogWrite(M_PWMPin,M_Speed);
}
voidStop()
{
analogWrite(M_PWMPin,0);
}
voidGoToAngle(inttarget,inthowFast)
{
//find out the current angle of the motor shaft
int currentAngle=((float)analogRead(potPin)-POT_VALUE_MIN)/(POT_VALUE_MAX-POT_VALUE_MIN)*MAX_ANGLE;
//First Check if we need to turn left or right.....
if(currentAngle<target)
{
SetTurnDirection(right);
}
else if(currentAngle>target)
{
SetTurnDirection(left);
}
SetTurnSpeed(howFast);
while(abs(currentAngle-target)>PERM_ERROR)//if the shaft is not at the required value,
{
Turn();//Keep on turning the shaft
//Allow the motor to turn a little and wait here for a moment...
delay(100);//adjust the delay as required depending on your motor speed
//update the current angle of the shaft
currentAngle=((float)analogRead(potPin)-POT_VALUE_MIN)/(POT_VALUE_MAX-POT_VALUE_MIN)*MAX_ANGLE;
}
Stop();//Stop the shaft after the error is acceptable
}
};
//DC Motor Class definition completed................//************************************************************//L298 pin defintions.....
int motor_p1=4;
int motor_p2=5;
int pwmPin=9;
DCMotorcustomServo(motor_p1,motor_p2,pwmPin);
//create an instance of the DC motor Class//set the speed at which the motor will turn (Max speed = 255)
int turnSpeed=200;
void setup()
{
//no code is needed here for a simple up and down swing of santa's arm}voidloop(){
//forwards turning..........
for(inti=30;i<=150;i+=15)//our motor will turn from 30 to 150 degrees in steps of 15 degrees
{
customServo.GoToAngle(i,turnSpeed);
}
//backwards turning..........
for( int i=150; i >= 30; i-=15)//now turn from 150 to 30 degrees in steps of 15 degrees
{
customServo.GoToAngle(i,turnSpeed);
}
}
